Summary
This is a continuation of the Creating Resource Packs tutorial. It is HIGHLY recommended you go through that tutorial first, as we cover some of the same steps there in more detail. In this tutorial, we will be covering:
- Overview of JSON data format
- How to create a Behavior Pack
- How to change mob behaviors
Also included along with this tutorial is the pig.json file with the changes we will be making if you want to check your work!
Time required
This tutorial should take around 1 to 1 and a half hours to complete.
Required tools
You will need the following programs to follow along with this tutorial:
A text editor
Any text editor should work but I would suggest using some sort of programming IDE. Notepad++ is an excellent, and FREE, text editor with syntax highlighting for lots of programming languages. You can download Notepad++ from here: https://notepad-plus-plus.org/
JSON data format
Before we start modifying entity behaviors we need to take a quick look at how JSON works. We aren't going to go too deep on the technical details of JSON, but if you would like to know more, please visit http://www.json.org/.
JSON revolves around 2 different data structures:
- Name and value pair
- Looks like: "name": value
- Ordered list of values
- Looks like: [ value, value, value, etc. ]
You can create objects that are unordered sets of name/value pairs. Values can also be objects and arrays.
Object example
"minecraft:scale": { "value": 0.5 }
The above object consists of a name value pair where "minecraft:scale" is the name, and the value is another name value pair ( "value":0.5 ).
Object example with a list
"minecraft:health": {
    "value": 10,
    "max": 60
},
Object example with an array
"minecraft:type_family":{
    "family": [ "monster", "undead" ]
}
- Note
Names and values are always separated by colons, and values are separated by commas. Also note that every open curly brace { has a closed curly brace }, the same is true for square brackets [ ] and quotation marks "". It is very important that you do not forget one of these. If even one is missing, it can cause unintended consequences and may make your JSON code not work.
Thankfully, there are some handy online tools to help check the validity of your JSON. You can use http://pro.jsonlint.com/ to check that your JSON is valid, just copy and paste your JSON code into the page and click the check mark. If the check mark turns green, your JSON is good to go. If the check mark is red, it will try to explain what went wrong. Note that this should only be used to check things like if you are missing curly braces or square brackets, etc. Your JSON can be technically valid but not work in game! We also allow comments in our json files, which is usually not valid for the JSON data format! This tool will say your json file is invalid if you have //comments, so when checking your code using this tool, remember to remove comments first.
Creating a Behavior Pack
Behavior Packs are add-ons that will modify the various behaviors that make up an entity. Currently we only support modifying existing entities by adding, removing, or changing existing behaviors. For this tutorial, we are going to add the creeper's exploding behavior to pigs. Before we can modify the pigs though, we must set up another pack.
Follow the same steps to make a Resource Pack but instead:
- Navigate to the behavior_packs folder and create a new folder called "Tutorial_Behavior_Pack"
- The behavior_packs folder can be found here: C:\Users\user_name\AppData\Local\Packages\Microsoft.MinecraftUWP_8wekyb3d8bbwe\LocalState\games\com.mojang\behavior_packs
- Create a JSON file called "pack_manifest.json"
pack_manifest.json
In this pack_manifest file you will want the following:
- pack_manifest.json
{
  "header": {
    "pack_id": "e3c5a9be-1cfc-4a74-9f70-9213bab32090",
    "name": "Tutorial Data Pack",
    "packs_version": "0.0.1",
    "description": "Tutorial resource pack 5",
    "modules": [
      {
        "description": "Not Used",
        "version": "0.0.1",
        "uuid": "14d5fb6b-ef0a-47e5-8a98-d615709c1a03",
        "type": "data"
      }
    ],
    "dependencies": [
      {
        "description": "Depends on Tutorial Texture Pack",
        "version": "0.0.1",
        "uuid": "891f5751-bb0e-47c6-91f0-fdc4e76949ef",
        "type": "resources"
      }
    ]
  }
}
Alternatively, you can copy the included file called "Behavior_pack_manifest.json" into your Behavior_Resource_Pack folder and rename it to "pack_manifest.json". Make sure you match the dependency "uuid" to the resource pack's module "uuid" as well as change the "pack_id" and module "uuid" for this manifest.
- Note
This is the same as the resource pack's "pack_manifest.json" except the module type is now "data" instead of "resources". Also, note that you need 2 new UUIDs for "pack_id" and "uuid". If you use the same UUIDs as in the resource pack earlier, the game will only see one of the add-ons.
- Note 2
There is a new section in this pack_manifest file! We've added a dependency section that allows you to link other packs into this one. In this example, we've made this add-on pack dependent on our Tutorial Resource Pack. This is done by making sure that the UUID for that dependency matches the UUID in the module section of the resource pack we want to link. Now when you load this add-on, it will also load the necessary resource pack.
Creating an icon
The process for creating an icon is the same as creating an icon for resource packs, please see the Creating Resource Packs for details. I've used the same icon for our behavior pack as our resource pack.
Testing our behavior pack
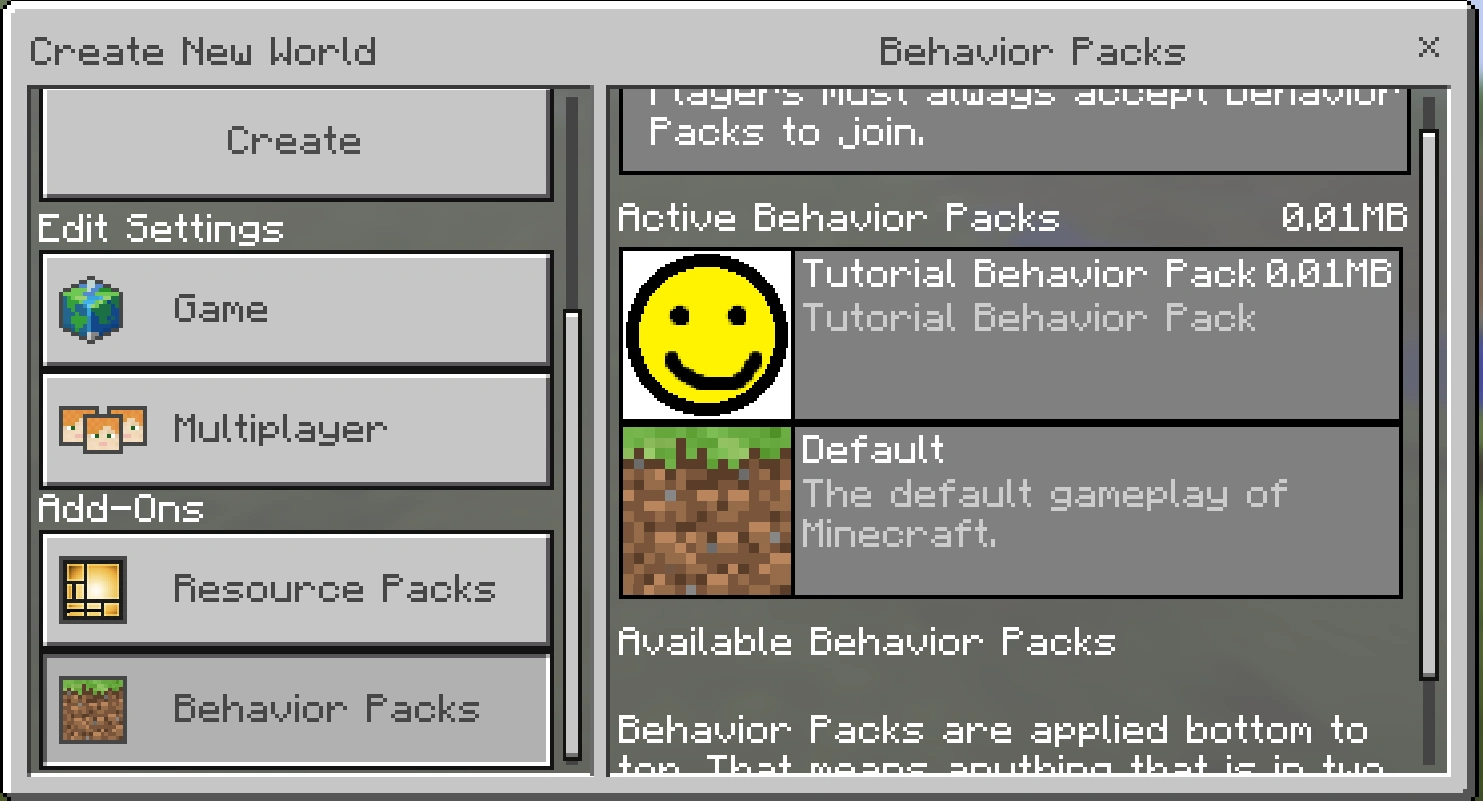
Now we are ready to test it out in game! Launch Minecraft and create a new world. On the left side of the screen scroll down and click on Behavior Packs. On the right side of the screen scroll until you see "Tutorial Behavior Pack" and click on it. Click continue on the popup, add-ons will disable the ability to get achievements while playing in that world. Your game should look something like this if you used the above code and icon:
- Note
Remember that you will need to create a new world every time you make changes to your behavior pack because the game makes a copy of the behavior pack when it creates the world. Again, you can avoid this if you modify the add-on that is contained in the world's folder. Remember that if you do this, you'll need to manually copy it back into the com.mojang/behavior_packs folder if you want to apply that pack to other worlds.
Setting up the JSON file structure
Now that our pack is set up, let's set up the folder structure for our .json files.
- In the tutorial_behavior_pack folder, create a new folder called "entities"
The entities folder is where we will put all our JSON files for changing entity behaviors. Let's start by grabbing pig.json from \Vanilla_Behavior_Pack\entities\pig.json and copying it into our entities folder. Once pig.json is copied over, open it up in the text editor of your choice.
Entity JSON overview
Before we start modifying the JSON code, let's take a brief look at how our entity.json files are set up.
The JSON files for Minecraft entities are broken into 4 different sections:
minecraft:entity
This is the main object for every mob, all the behaviors and events that follow are the values contained in this object.
- entity.json pseudocode
{
  "minecraft:entity": {
    "format_version": 0.1,
    "component_groups": { component groups go here },
    "components": { components go here },
    "events": { events go here }
  }
}
- Note
This is not valid JSON for Minecraft! This is just an example of how our entity json files are laid out to use as reference. If you take a look at pig.json you will notice that "component groups go here" is actually filled in with components.
- Note 2 - format_version
Format version is used to tell Minecraft what version of the JSON it should be trying to read. As we update our JSON and add new components, we need to tell the game what things it should be looking for. We do this by changing the format_version number.
DO NOT CHANGE THIS NUMBER! As the Minecraft JSON updates, you will need to update your JSON files to match what was added. However, if you do update your JSON, you will need to change this number to whatever the new number is. Alternatively, you can copy the new version of the JSON from the updated Vanilla files and then copy over the specific behaviors you had changed in the old version.
Component groups
Used to define groups of behavior, allow for easy removal/addition of multiple behaviors, useful for making states (i.e. Pig baby vs pig adult behaviors).
In pig.json there are 6 groups including pig_baby, pig_adult. Note that the behaviors in those groups will only run if the group is currently added to the entity. Thus, when the pig is a baby pig, the pig_baby component group will be added and running, but the pig_adult group will not be.
Components
Used to define individual behaviors that will run on every entity of this type.
Note that things like "minecraft:identifier" and "minecraft:type_family" are here because we want every type of pig to have these components.
Events
Events are used to add or remove component groups and are triggered by components we've added, or by Minecraft's native code.
Events can use a randomize function to pick between different results (see "minecraft:entity_spawned" in pig.json). Note that the weights for randomize can add to over 100. This is because they are not percentages! If you set the weight for making an adult pig to 23 and then the weight for making a pig baby to 100 then you will have a 23/123 chance of getting an adult pig and a 100/123 chance to get a baby pig when a pig is spawned.
Components of note:
minecraft:identifier
This is required for every entity. This is how the game knows what entity this .json file will run behaviors for. The identifiers must be named appropriately! If you give an incorrect identifier you will either get unintended results or your entity may not work at all. If you aren't sure what the identifier should be for an entity, please refer to the json file for that entity in the Vanilla Behavior Pack (remember json files are in /Vanilla_Behavior_Pack /entities/)
minecraft:type_family
This sets the family type for the entity. Family types are used for filtering entities for various components. See "minecraft:rideable" and "minecraft:breedable" for examples where type is used!
minecraft:entity_spawned
This is an event that is triggered when an entity of this type is spawned. In pig.json this has a randomize function that determines whether the pig is going to spawn as a baby or an adult pig.
Making pigs explode
Adding components
Now that we've looked at how an entity is setup; it is time to actually modify the pig's code!
Find the creeper.json file in the Vanilla Behavior Pack's entity folder (Vanilla_Behavior_Pack/entities/) and open it in a new text editor window. You should now have the pig.json from our custom add-on and creeper.json from Vanilla open in two separate windows.
The first thing we want to do is to have the pig find a target. We can do this by adding the "minecraft:nearest_attackable_target" and "minecraft:target_nearby_sensor" components into the components object for pig.json.
Find "minecraft:behavior.random_look_around" in the components object, it should be the last component before the "events" section.
Add a comma after the closing bracket of random_look_around. This is where we are going to add the targeting component. Either type or copy and paste the target_nearby_sensor and nearest_attackable_target components from creeper.json into pig.json. The end of Pig.json's "components" section should now look something like this (new text is highlighted in green):
pig.json excerpt:
...
"minecraft:behavior.random_look_around": {
  "priority": 9
},
"minecraft:behavior.nearest_attackable_target": {
  "priority": 1,
  "entity_types": [
    {
      "filters": { "other_with_families": "player" },
      "max_dist": 16
    }
  ],
  "must_see": true
},
"minecraft:target_nearby_sensor": {
  "inside_range": 3.0,
  "outside_range": 7.0,
  "on_inside_range": {
    "event": "minecraft:start_exploding",
    "target": "self"
  },
  "on_outside_range": {
    "event": "minecraft:stop_exploding",
    "target": "self"
  }
}
...
Notice that the ending brace for target_nearby_sensor does not have a comma after it because it is the last value in the value list for "components".
minecraft:nearest_attackable_target
This component finds the nearest attack target given certain restrictions.
- Priority – This sets how important this component is. Components with a higher priority will be more likely to be run. Note that a lower number means a higher priority and that priorities can be negative!
- Entity_types – This is where we filter for what types of entities this entity can set as its target.
- Max_dist – if the entity we want to be able to targets is within this many blocks from this entity than we can target it
- Must_see – whether the entity that we want to target must be seen to be able to be set as our target
Notice that in our code, we are filtering for type player and that we will be able to set it as our target once they get within 16 blocks this entity.
minecraft:target_nearby_sensor
This component will trigger events based on how close the entity's target is.
- Inside_range – the distance in blocks that a target is considered to be inside this entity's range
- Outside_range – the distance in blocks that a target is considered to be outside this entity's range
- On_inside_range – this will trigger the event specified when a target is close than inside_range
- On_outside_range – this will trigger the event specified when a target is farther than outside_range
Notice that on_inside_range and on_outside_range are going to be triggering the events "minecraft:start_exploding" and "minecraft:stop_exploding" respectively. This won't currently do anything because we have not added these events yet!
Adding events
Scroll down to the bottom of the "events" object in pig.json and add a comma after the closing curly brace of "minecraft:on_unleash". This is where we are going to add our new start and stop exploding events.
Either type or copy and paste the "minecraft:start_exploding" and "minecraft:stop_exploding" events from creeper.json into pig.json. The end of Pig.jsons events section should now look something like this (new text is highlighted in green):
pig.json excerpt:
...
"minecraft:on_unleash": {
  "remove": {
    "component_groups": [
      "minecraft:pig_leashed"
    ]
  }
},
"minecraft:start_exploding": {
  "remove": {
    "component_groups":[
      "minecraft:hunting"
    ]
  },
  "add": {
    "component_groups": [
      "minecraft:exploding"
    ]
  }
},
"minecraft:stop_exploding": {
  "remove": {
    "component_groups": [
      "minecraft:exploding"
    ]
  },
  "add": {
    "component_groups": [
      "minecraft:hunting"
    ]
  }
}
...
Now that we have brought over the creeper events, we need to do some cleanup. Our pig doesn't need a hunting component group so we can remove the "remove" section from start_exploding and the "add" section from stop_exploding. Our code should now look like:
pig.json excerpt:
...
"minecraft:on_unleash": {
  "remove": {
    "component_groups": [
      "minecraft:pig_leashed"
    ]
  }
},
"minecraft:start_exploding": {
  "add": {
    "component_groups": [
      "minecraft:exploding"
    ]
  }
},
"minecraft:stop_exploding": {
  "remove": {
    "component_groups": [
      "minecraft:exploding"
    ]
  }
}
...
Notice that both events are adding and removing a component group called "minecraft:exploding". Our pig does not have this component group yet!
Adding component groups
Scroll back up to the top of pig.json to the "component_groups" section. Find the last component group, which should be pig_leashed, and add a comma to its closing curly brace. Now either type the following, or copy the "minecraft:exploding" component group from creeper.json. Pig.json should now look like the following (new code in green):
pig.json excerpt
...
  "minecraft:pig_leashed": {
    "minecraft:behavior.move_towards_restriction": {
      "priority": 2,
      "speed_multiplier": 1.0
    }
  },
  "minecraft:exploding": {
    "minecraft:explode": {
      "fuseLength": 1.5,
      "fuseLit": true,
      "power": 3,
      "causesFire": false
    }
  }
},
"components": {
  "minecraft:damage_sensor": {
...
minecraft:explode
fuseLength – how long it takes, in seconds, until this entity explodes from when the fuse is lit
fuseLit – whether the fuse is automatically lit when this component is added
power – this determines the damage done, and how big the explosion radius is
causesFire – this determines whether the explosion will cause nearby blocks to catch on fire or not
Let's add a scale component to this group as well, so that our pig grows in size before it explodes! Add a comma to the closing curly brace of the "explode" component and put in the following (new text in green):
pig.json excerpt
...
  "minecraft:exploding": {
    "minecraft:explode": {
      "fuseLength": 1.5,
      "fuseLit": true,
      "power": 3,
      "causesFire": false
    },
    "minecraft:scale": {
      "value": 2
    }
  }
},
"components": {
  "minecraft:damage_sensor": {
...
minecraft:scale
Value – a multiplier to the normal scale of the entity. A value of 2 will double the scale, a value of .5 will halve the scale, etc.
Testing our add-on
- Launch the game
- Create a new world
- Set world to creative
- Turn on cheats
- Click on add-ons
- Find "Tutorial Behavior Pack" in the list on the right and click it
- Click play
- Spawn a pig using the pig spawn egg from the creative inventory
- Run 20 blocks or so away
- Switch mode to survival by using the slash command: /gamemode s
- Run towards the pig
Congratulations!
You've only just scratched the surface of what is possible with Add-ons! If you want to be able to do more than just make things explode, check out the Entity Component Reference Guide to see other behaviors and components you can add to entities! You can also always look at how the Vanilla Behavior pack is set up for examples.
Note on available behavior changes
Not all behaviors of a mob are data driven yet! You will not be able to change the details for special movement behaviors like flying (bat, ghast, blaze) or swimming (squid, guardian, guardian elder). This can also interfere with behaviors you might add to them. For example, giving the squid a melee attack will not work while it is in water as its swimming behavior is still hard coded. Additionally it is not possible to just spawn another mob or item at any time, for example the Chicken's ability to lay eggs is not data driven yet and you will be unable to control it.
Look forward to these changes in the future!
Challenges
Now that you've gotten some basic experience, here are some challenges:
- Make zombies rideable by the player
- Have the player able to control direction with an item (hint: look at pig's item_controllable and controlled_by_player)
- Make villagers transform into skeletons when given a bow (hint: look at wolf's tameable and villagers transformation)
- Change the texture of the sun and moon
- Make a cow shoot the ghast's projectile
Troubleshooting JSON
If your JSON changes don't appear to be working in game, check the following things:
- Make sure that you've typed everything correctly. Typos and missing punctuation will cause unwanted behavior!
- Make sure the .json file is in the correct folder and named correctly!
- You should have a folder called entities that contains all your .json files
- Make sure your entity has the correct identifier
- Check the .json file in the Vanilla Minecraft pack if you aren't sure what it is supposed to be
- Vanilla's .json files can be found in /Vanilla_Behavior_Pack/entities
Exporting and sharing
Now that you've created a behavior pack, you probably want to share it with friends! To do this, perform the following:
- Navigate into your behavior pack folder
- (C:\Users\USERNAME\AppData\Local\Packages\Microsoft.MinecraftUWP_8wekyb3d8bbwe\LocalState\games\com.mojang\behavior_packs\tutorial_behavior_pack)
- Select all of the files and folders
- Right click on the highlighted files and select send to -> compressed zip folder
- Name the file tutorial_behavior_pack.mcpack
- Make sure to change the file extension to .mcpack
- when the popup asks you if you are sure you want to change the file extension. Hit Yes
You can now give your friends that .mcpack file! When they open it, Minecraft will launch if it isn't running yet, and then it will import your resource pack for them to use!
- Note
You can test to see if this work by deleting your copy in your resource_packs folder (make a backup first!), then opening your mcpack to import it. If it doesn't work, make sure you selected the contents of your resource_pack and not the folder itself when making the .mcpack zip.
- Note 2
If your behavior pack references a resource pack, the mcpack won't automatically include that resource pack as well, even if you have given the behavior pack_manifest a dependency on that pack. If you have a resource pack dependency either: make a .mcpack for the resource pack as well, or make a world and add the behavior and resource packs you want to export and then export that world. When that world is imported, the save folder for that world will have a folder for the behavior_packs and resource_packs of that world. You can copy those packs to your local folders to be able to see them in the behavior and resource pack menus and add them to other worlds.
| エディション |
| ||||||||||||
|---|---|---|---|---|---|---|---|---|---|---|---|---|---|
| 開発 | |||||||||||||
| 技術情報 | |||||||||||||
| マルチプレイ | |||||||||||||
| 限定要素 |
| ||||||||||||
| 削除済み | |||||||||||||
| 新人向け |
| ||||||||||||
|---|---|---|---|---|---|---|---|---|---|---|---|---|---|
| 全般 | |||||||||||||
| チャレンジ |
| ||||||||||||
| 建築 | |||||||||||||
| 生産 |
| ||||||||||||
| エンチャントと製錬 | |||||||||||||
| ブロック破壊 |
| ||||||||||||
| メカニズム |
| ||||||||||||
| サーバー |
| ||||||||||||
| 技術的なチュートリアル |
| ||||||||||||
| 古いチュートリアル |
| ||||||||||||