Yoshi Hikogori (トーク | 投稿記録) (→manifest.json: 翻訳作業) |
Yoshi Hikogori (トーク | 投稿記録) (→JSON ファイルを作成する: UUIDの項) |
||
| 85行目: | 85行目: | ||
拡張子が表示されない場合は、下の画像のように上部の「表示」をクリックし、「ファイル名拡張子」にチェックを入れればよい。 |
拡張子が表示されない場合は、下の画像のように上部の「表示」をクリックし、「ファイル名拡張子」にチェックを入れればよい。 |
||
<center>[[ファイル:FileExtensions.png|750px]]</center> |
<center>[[ファイル:FileExtensions.png|750px]]</center> |
||
| + | |||
| + | === UUID とは === |
||
| + | |||
| + | UUID は異なる Add-on のパックを区別するために必要となる、文字列の ID である。そのため UUID は固有のものである必要があり、異なるパックで使いまわしたりしてはいけない(表示されなくなるためである)。 |
||
| + | UUID の生成は容易に行うことができる。ここでは[https://www.uuidgenerator.net/version4 この]サイトを紹介する。 |
||
=== {{cd|manifest.json}} === |
=== {{cd|manifest.json}} === |
||
2019年1月13日 (日) 15:22時点における版
概要
このチュートリアル記事は初心者向けの内容となっている。特定のコンポーネントの詳細について知りたい場合は、 エンティティデータ参考資料を参照。この記事では以下の内容について記述する。
- リソースパックの作成方法
- テクスチャの変更方法
- エンティティ
- ブロック
- アイテム
所要時間
1〜1.5 時間で終えられる内容となっている。
必要なもの
以下のツールが必要となる。
テキストエディタ
種類は問わないが、プログラミング用の IDE をお勧めする。Notepad++ は無料であり、多くのプログラミング言語の構文ハイライト機能を備えている。 ここからダウンロードできる。 複数のファイルを効率的に管理する目的においては、Visual Studio Code を使用することもお勧めである。
画像編集ソフト
Windows 標準のペイントでも画像の編集は可能である。だがニワトリなどの透過画像を保存することができない。そこでここでは、無料な上に透過画像を保存することができる GIMP をお勧めする。 ここからダウンロードできる。
Paint NET も透過度に対応し、よりシンプルな UI を持っている。ここからダウンロードできる。
始めに
ここで解説することはリソースパックで出来ることの一部に過ぎない。 リソースパックでは
- テクスチャ
- テクスチャアニメーション
- エンティティのモデル
- サウンド(効果音)
- UI
- ブロック・アイテム名などの翻訳テキスト
などが変更できる。
その中でも今回は「テクスチャの変更」に焦点を当てる。
リソースパックを作成する
次の手順に従ってリソースパックのフォルダを作成する。
resource_packsフォルダの直下に、任意の名前の、リソースパックとなるフォルダを作成する。この記事では、例としてチュートリアルリソースパックという名前にする。resource_packsフォルダのパスは、com.mojang/resource_packs/である。
com.mojangフォルダのパスは、Minecraft の動作環境によって次のようになっている[1]。
動作環境・基本ソフト 場所 Windows C:\[ユーザー名]\AppData\Local\Packages\
Microsoft.MinecraftUWP_8wekyb3d8bbwe\LocalState\games\com.mojangAndroid [ストレージ名]/games/com.mojangSamsung Gear VR(Galaxy) Amazon Fire TV iOS Apps/com.mojang.minecraftpe/Documents/games/com.mojang
- なお、iOSの
Apps/com.mojang.minecraftpe/Documents/フォルダは、iTunesのファイル共有機能を用いて、任意の端末を選択 → サイドバー設定内の「ファイル共有」 → App内「Minecraft」 → 「Minecraftの書類」と進むなどして参照できる。
- なお、iOSの
JSON ファイルを作成する
チュートリアルリソースパック フォルダの直下に、manifest.json という名前の JSON ファイルを作成する。このファイルはリソースパックを Minecraft に認識させるために必要である。また、このファイルにはリソースパックの名前、説明、ID (UUID) を記述する。UUID については下記を参照。
注意
ファイルの拡張子は .txt でなく .json である
変更の際に Windows では警告表示が出るが、「はい」を押せばよい。
拡張子が表示されない場合は、下の画像のように上部の「表示」をクリックし、「ファイル名拡張子」にチェックを入れればよい。

UUID とは
UUID は異なる Add-on のパックを区別するために必要となる、文字列の ID である。そのため UUID は固有のものである必要があり、異なるパックで使いまわしたりしてはいけない(表示されなくなるためである)。 UUID の生成は容易に行うことができる。ここではこのサイトを紹介する。
manifest.json
manifest.json をテキストエディタで開き、次のように入力するかコピー&ペーストする。
- manifest.json
 {
   "format_version": 1,
   "header": {
     "description": "チュートリアルリソースパック",
     "name": "チュートリアルリソースパック",
     "uuid": "bc2a0bc9-e3a2-4702-9319-d4d3231dfdbc",
     "version": [0, 0, 1]
   },
   "modules": [
     {
       "description": "チュートリアルリソースパック",
       "type": "resources",
       "uuid": "891f5751-bb0e-47c6-91f0-fdc4e76949ef",
       "version": [0, 0, 1]
     }
   ]
 }
"header" 要素と "modules" 要素の中の "uuid" 要素の値が2つの異なる UUID であることを確認すること。上記のように、ここで UUID を生成できる。最初の "name" 要素と "description" 要素の値には、Minecraft で表示したい文字列を入力できる。
注意
名前と値は常にコロンで結ばれ、値はコンマで区切られる。また、すべての開き波括弧「{」は閉じ波括弧「}」を対にし、角括弧「[]」および二重引用符「""」についても同じことが言える。これらの対の片方を忘れないことは非常に重要であり、1つでも欠けていると、意図しない結果を招き、JSON の記述が機能しなくなる可能性がある。
Testing our Pack
Now we are ready to test it out in game! Launch Minecraft and create a new world. On the left side of the screen scroll down and click on Resource Packs. On the right side of the screen scroll until you see “Tutorial Resource Pack”. Your game should look something like this if you used the above code:
Troubleshooting
If you don’t see your pack in game, make sure your manifest.json is correct. Look for any missing curly braces { }, commas, colons :, quotation marks “”, or square brackets [ ]. Remember for each open brace, quotation, or square bracket, you must have a closing brace, quotation, or square bracket.
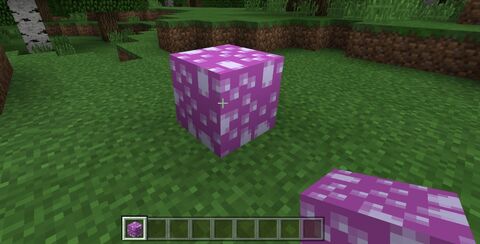
Creating an Icon
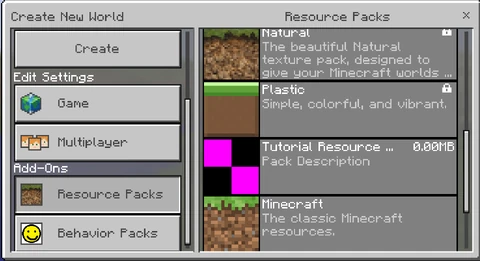
As you may have noticed, our pack does not have an icon! If you do not specify an icon, a pink and black checkerboard texture will show up next to your pack.
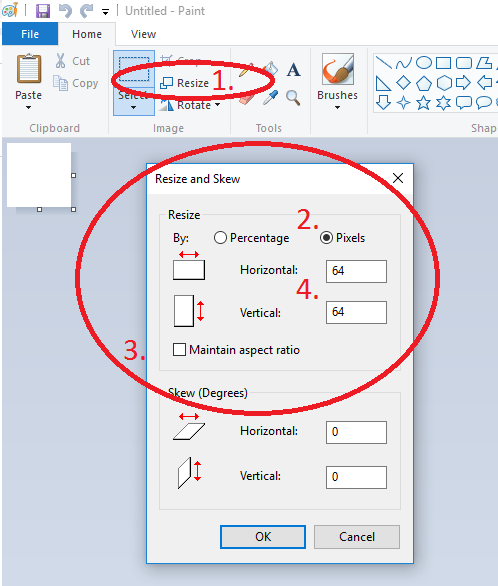
In the image editor of your choice, create a new image with a size of 128 by 128 pixels.
To do this with MS Paint:
- Click resize
- Change from percentage to pixels in the resize dialog that pops up
- Uncheck maintain aspect ratio
- Type in 128 in both horizontal and vertical text entry boxes
- Click OK
Once you have the correct canvas size, draw whatever you want your icon to be. For this tutorial, we’ve created a crudely drawn smiley face:

Save your icon with the name “pack_icon” and make sure that it is saved as a .png. Save it into the same folder that we put our manifest.json file. For reference, our folder should look like this now:
Now if we launch the game and go to the resource packs section of create world it should look something like this:
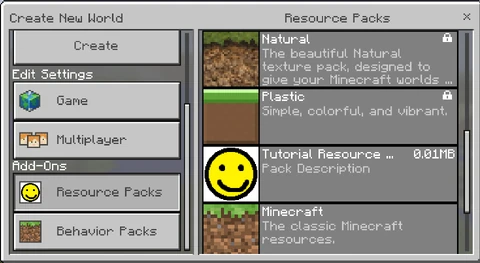
Click on the tutorial resource pack to add it to the world you are making!
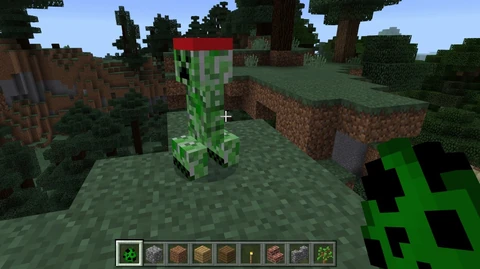
Modifying an Entity’s texture
Now that we have our resource pack set up, let’s modify the creeper’s texture!
However, before we can do some painting, we need to set up the folder structure that Minecraft expects resource packs to be in. To do this, do the following:
- Create a folder named “textures” in our Tutorial_resource_pack folder
- Inside “textures”, create a folder called “entity”
- Inside “entity”, create a folder called “creeper”
- Copy the creeper texture from the Vanilla Minecraft resource pack into our newly created creeper folder. After downloading the example pack, the texture can be found on this file path: \Vanilla_Resource_Pack\textures\entity\creeper
Your folder should now look like:

Now that we have the normal creeper texture, open it up in the image editor of your choice. It should look something like this:

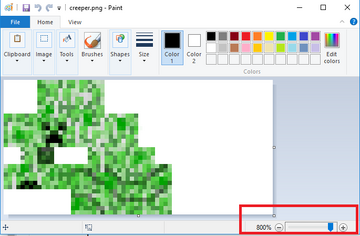
You might notice your texture looking small, make sure to zoom in on the texture. In MS Paint you can control magnification in the bottom right hand corner of the window with the slider.
A quick note on textures
If you’ve never seen a texture before, the above image might surprise you. The best way to think about it is like wrapping a gift with wrapping paper, but instead our wrapping paper is our texture. Here is how the creeper’s texture is laid out:
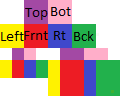
| Image Key | |
|---|---|
| Top | Top of cube |
| Bot | Bottom of cube |
| Left | Left side |
| Frnt | Front side |
| Rt | Right side |
| Bck | Back side |
Areas with matching colors face the same direction (i.e. Red areas are always the front of a cube).
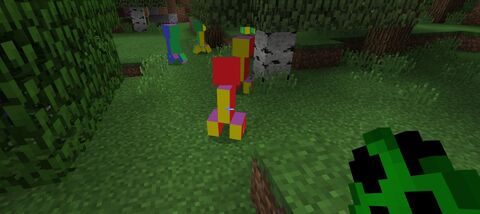
How this looks in game:
Note
Not every texture is laid out in the same way, you will need to experiment and find out how each entity’s texture is laid out. Advanced users can look at the mobs.json file in the model folder to find where the textures' UVs are for each body part.
Now it’s time to be creative! Edit the creeper however you want. I’m just going to add a headband for sake of simplicity.
Once you are happy with your texture, save out the file as a .png and make sure that the file name is “creeper”. The game will only look for files with the correct name. When in doubt, check the Vanilla Minecraft Resource Pack to see file names.
A note on texture file formats
Minecraft supports .pngs, .tgas and .jpgs. However, it will first try to load the png version, then the tga, then the jpg. This means if you have 2 creeper textures, one as a png, and one as a tga, the game will see the png one first and load that as your creeper’s texture.
Testing our Resource Pack
- Launch the game
- Create a new world
- Set world to creative
- Click on Resource Packs
- Find “Tutorial Resource Pack” in the list on the right and click it
- Click Play
- Spawn a creeper using the creeper egg from the creative inventory
Results
If you decide you want to make some changes to your texture, just save and quit the level, close the game, edit your texture, relaunch the game, and follow the steps above to create a new world and attach your resource pack to it again. Note that if you launch the last world, you will not see the changes. This is because when you create a world with an add-on attached, it copies your add-ons into the world file. This means you will have 2 different versions of your pack. As you continue to work on the one in the resource_packs folder, the one attached to your world will become out of date. BUT most of the time, when you have made more than 1 world that has this texture pack, you can delete the texture pack in that specific world and reload it.
Challenge 1
Using what you know now, create a new texture for pigs and for chickens.
- HINTS
- Chickens don’t have a folder for their textures like creepers, their texture just goes in the textures/entity folder.
- Chickens have transparency, so remember to use an image editing program that can save transparency
Block Textures
Now that we’ve gone through the process for an entity, changing textures for a block should seem straightforward. Let’s create a new texture for our stone block.
To create a new stone texture:
- In your textures folder create a new folder called “blocks”.
- Copy the stone texture from the Vanilla Minecraft Resource Pack into our new blocks folder
- It can be found here: /Vanilla_Resource_Pack/textures/blocks/stone.png
- Open stone texture in an image editing software and make edits
- Test in game
Here is my new stone texture:

and how it looks in game:
Challenge 2
Congratulations! Now that you can create your own block textures, try making a new texture for the furnace.
HINT: furnaces use different textures for front, side, top, and front when turned on, make sure to edit all of them.
Item Textures – Challenge 3
Creating a new item texture is like making a new block texture. Follow the same steps as above but make sure to make a folder called “items” in your textures folder and place your item textures there. Remember, you can always look at the Vanilla Minecraft resource pack as an example (/Vanilla_Resource_Pack/textures/items).
Environment Textures
You can also change the textures for clouds, the moon, the rain, the snow, the sun, and the cracking animation that plays when you break blocks. These textures should be put into a folder called “environment” in the textures folder.
Troubleshooting textures
If your texture is not showing up in game, check the following things:
- Make sure it has the same name as the asset you are trying to replace
- Example: Creeper texture should be called “creeper”, stone texture is called “stone”
- Make sure the texture is in the correct folder!
Congratulations
You’ve completed this tutorial and should now know how to create your own resource pack add-ons!
Exporting and Sharing
Now that you’ve created a resource pack, you probably want to share it with friends! To do this, perform the following:
- Navigate into your resource pack folder
%localappdata%\Packages\Microsoft.MinecraftUWP_8wekyb3d8bbwe\LocalState\games\com.mojang\resource_packs\tutorial_resource_pack
- Select all of the files and folders
- Right click on the highlighted files and select Send to -> Compressed (zipped) folder
- Name the file
tutorial_resource_pack.mcpack- Make sure to change the file extension to
.mcpack- When the popup asks you if you are sure you want to change the file extension. Hit Yes
- Make sure to change the file extension to
You can now give your friends that file! When they open it, Minecraft will launch if it isn’t running yet, and then it will import your resource pack for them to use!
The Deeper Understanding
Soon, with practice, you'll be able to make Texture Packs, and upload them to various sites such as MCPEDL. Link to Vannila Textures Pack (1.8) {Go deeper down until you see Download the zips for the Resource Pack} Tips- -To rename something, go into the Text file, and find en_us (for english), it is seperated into stuff like items and tiles to acheivements or warnings -Some mob textures are TGAs, You can get a converter such as Pixxelon. -Some other textures (Such as the Sea Lantern,) are animated, and are seperated into 4 frames vertically. -If some textures like Zombie Pigman are complicated, try imagining it as a papercraft, or a net, but some parts are in the wrong place (eg. Top,bottom next to eachother)
Note
You can test to see if this work by deleting your copy in your resource_pack folder (make a backup first!), then opening your mcpack to import it. If it doesn’t work, make sure you selected the contents of your resource_pack and not the folder itself when making the .mcpack to .zip.
| エディション |
| ||||||||||||
|---|---|---|---|---|---|---|---|---|---|---|---|---|---|
| 開発 | |||||||||||||
| 技術情報 | |||||||||||||
| マルチプレイ | |||||||||||||
| 限定要素 |
| ||||||||||||
| 削除済み | |||||||||||||
| 新人向け |
| ||||||||||||
|---|---|---|---|---|---|---|---|---|---|---|---|---|---|
| 全般 | |||||||||||||
| チャレンジ |
| ||||||||||||
| 建築 | |||||||||||||
| 生産 |
| ||||||||||||
| エンチャントと製錬 | |||||||||||||
| ブロック破壊 |
| ||||||||||||
| メカニズム |
| ||||||||||||
| サーバー |
| ||||||||||||
| 技術的なチュートリアル |
| ||||||||||||
| 古いチュートリアル |
| ||||||||||||