小さなキノコの養殖
キノコは明るさレベルが12より大きい正方形にしか成長しないので、農家は光源の配置を注意深く検討する必要があります。キノコはどこにでも配置できますが、明るい場所や不透明/透明なブロックがあり、水、作物, サボテンと苗木などの余分なスペースは必要ありません。 しかし、夜間であっても、昼間の照度が12未満のブロックにのみ植え付けることができます。例外は、菌糸とポドゾルですが、植え付けて日差しを保てばできます。それらは植えられなかったタイプを含む他の不透明なブロックにゆっくりと広がります。キノコは、元のきのこの周りに9x9x3(L、W、H)の領域に5つ未満のキノコがある場合にのみ広がります。
基本的なキノコの農業における主な危険は、栽培は、低照度の屋内の部屋でなければならず、しばしばモンスターが同じ場所にスポーンすることがある(ピースフルを除く)。これはいくつかの点で対策することができます。簡単な方法は、キノコを成長させたい場所から上の2ブロック上にトーチを置くことです(時には、天井の頭上にある小さな穴でカットすることもあります)。もう1つの方法は、農業地域を1ブロック高くし、ハーフブロックで道を舗装することです。これはモブがハーフブロックにスポーンすることができないので、いくつかの危険を取り除けます。水を使用して、キノコを部屋の外に出して収集ポイントに送ることもできます。ネザーはキノコの農場を始めるのに安全な場所です。そこにいるモブは小さな空間に出現しないからです。
最近のバージョンの変更により、通常のキノコの栽培はより困難になりました。別の選択肢は、大規模な地下室を準備し、複数のキノコを採ることが出来る巨大なキノコを成長させるために骨粉を使用することです。
スプレッドメカニックス
すべてのチック、すべてのキノコは、以下のことを行うために1/100のチャンスが与えられる:
- キノコを中心とした3x3x3の立方体のランダムなブロックを選択する(キノコ自体はブロックではない)。これは、キノコ自身のレベル、中間の3x3の正方形を好むから:上段と下段にはそれぞれ1/4チャンスが与えられ、キノコのレベルには1/2が与えられる。選択したブロックにキノコを植え付けることができれば(空気、明るさ= 12、下のブロックは不透明ブロックにする)、次のようにします。
- 前に選択したブロックを中心に3x3の正方形の別のランダムブロックを選択します。このブロックがきのこもサポートできる場合は、そこに作成します。
最初にランダムに選択されたブロックは、キノコ自体、それが上にあるブロック、または上記のブロックであってもよいことに注意してください。「植え付けることができる」チェックで3つすべてのケースで失敗すると、全体的な普及率をさらに低下させます。
以下は、アルゴリズムから推定することができる。
- キノコは、途中のブロックが空いている場合でも、離れた二つのブロックに拡散する可能性がある。
- きのこは、3つの軸すべてに沿って斜めに広がることがある。
基本的なきのこの農業
この方法は、初心者のキノコの農家にとって、モンスターがわかないための、採掘が必要な農場を確実にするために、徹底した照明に依存する。必要に応じて、高さを2ブロック、水平に大きくする。定期的に1ブロックを部屋の天井に掘り、凹んだ所に照明やトーチを置く。これは明るさが12の床の高さにキャストし、マッシュルームの成長と広がりを可能にします。6個の四角ごとに1個のトーチを設置すれば、モブがスポーンする危険はない。この設定は、最も速くキノコの成長させる方法です。キノコを床の上に広げて、成長するまで待ちます。
巨大キノコ
Huge mushroom minimum growth requirements
赤か茶色のキノコのいずれかに骨粉を使用すると、十分な部屋があれば巨大キノコが成長し、適切なブロックにキノコが植えられれば育つ。巨大キノコは収穫時に20個以上のキノコを収穫ことができる。
右側の画像は最小の成長要件を示している。
- 写真の木は、そのサイズの巨大キノコを成長させるために必要な最小の高さを示している。巨大キノコは、5、6、または7ブロックの高さで、最大高さは1ブロック上の利用可能なスペースよりも短くできる。したがって、7メートル上にブロックがある場合、巨大キノコは常に5ブロックの高さに成長する。
- 下のハーフブロックは、必要な領域(7×7)と、軸にすぐ隣接するブロックが空気でなければならないという事を示しています。
- 右側の菌糸は、巨大な赤いキノコのフットプリントが小さいため、必要なスペースが重なる領域を示しています。マッシュルームは、土、草、ポトゾル、または菌糸ブロック(図示せず)上に植え付けなければならない。
- Placing blocks where the inside of a red mushroom would be does not hinder the growth of the mushroom substantially, only if the blocks are directly in the way or lie outside of the mushroom will it not grow. By placing dirt blocks around where the stem of the mushroom is supposed to be, you can block the light allowing you to place the mushroom even closer to the surface - then fill up your tunnel and remove the dirt inside of the mushroom once it's grown.
Also if you make a 1x1x1 hole in the ground and fill it with water you will then be able to place a mushroom and use bone meal on it. Even in daylight!
Bear in mind that the huge mushroom may still attempt to grow at a taller height than space is available, failing and wasting a bone meal. It is therefore usually ideal to farm with the maximum space available (7×7×8), so that the bone meal will never fail.
Methods of Farming
- Some of these methods could be outdated, leave comments if you find an obsolete method.
Tunnel method
One way of growing a red mushroom on the surface of the world at any time of day without mycelium (using bone meal) is to dig a tunnel starting from several blocks where the mushroom should sprout, and plant the mushroom two or three blocks below the surface at the end of the tunnel. Then dig a single block chute to the surface from above the mushroom. If the mushroom is deep enough underground, it will not pop off when exposed to the light above it. Once there's light, use the bone meal and see if it grows the mushroom. If it does not, there may be too many blocks in the way of the mushroom, in which case, planting the mushroom closer to the surface may make it grow.
Semi-Automatic Farming
- Step 1.
Lay down redstone in lines with 2 blocks in between each line 15 blocks long. Attach a button to this circuit. Fill the spaces in between the lines with sticky pistons. Place dirt on top of everything (pistons and redstone). Place a piston circuit to allow water to spill forward like in the original design. Attach a lever to this circuit. Adjust circuits as needed for length (I prefer wide to long, as it's easier to wire).
- Step 2.
Place seed mushrooms on the dirt on top of the redstone.
- Step 3.
Press button to dislodge mushrooms, then flip lever to have water bring them down to you. Repeat the design down a hallway, raising the floor one time with each repetition. Allow the water to spill into a central channel and bring the mushrooms to you.
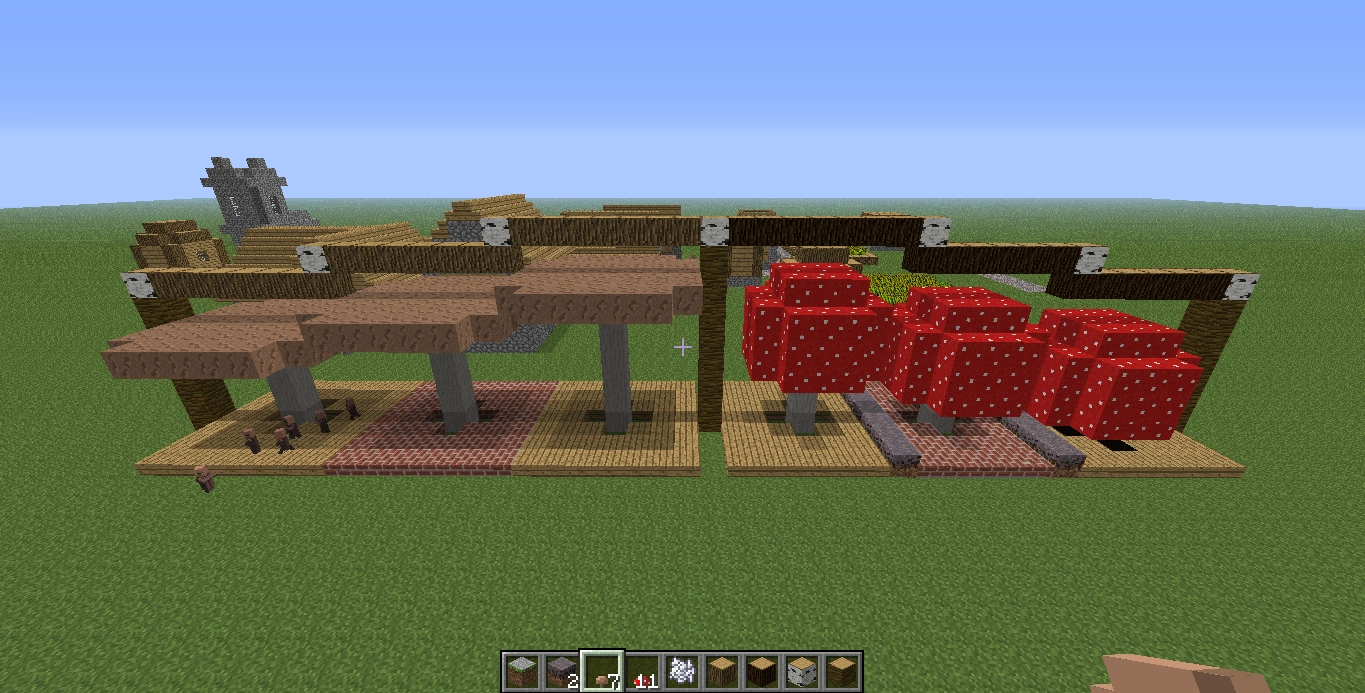
Fully-Automatic Mushroom Farming
Using water dispensers and a light sensor circuit
In the following design mushroom is planted on central platforms and new mushrooms will spread to side platforms. Water will flow once a day through the side platforms delivering the new spread mushrooms to hoppers and finally into chests.
On the central platforms mushrooms can be planted in packs up to four mushroom of each kind. Planting more mushroom will increase the spreading speed, but will also reach its cap limit sooner. In the video three mushroom of each kind are planted, as it gives higher daily output.
The side platforms should be one block height to improve efficiency, whilst the central ones should be 3 blocks height, in the video the central platform has middle glass platforms, as mushroom can't spread over glass.
A circuit using a light sensor emits two delayed pulses once a day, activating and deactivating dispensers containing water buckets, making water flow through the side platforms for about 12 seconds, enough to deliver every new mushroom spread in the side platforms to a hopper collection point, that will store mushroom into chests.
The farm can be covered in glass if the platforms are built in mycelium, or can be covered in any other non transparent block, both designs are shown in the video.
Using lighting redstone and a minecart system
(outdated)
A fully automatic mushroom farming using variable lighting, redstone, and a small minecart system is possible. This type of farm is very complicated however, and difficult to explain without an example, so a video has been included to help with understanding at the bottom of this section.
Variable light can be created by placing lava inside a 3x3 square "ring" of cobblestone, capping the lava off with any block, and attaching signs to all four sides of the block that is located above the lava. Fire will attempt to spread to the sign, and as signs are currently non-flammable it will temporarily set the cobblestone of one of the corner blocks on fire.
By placing a block two away from where the fire will start (Meaning you will need to place 8 blocks total, two for each corner of the starting ring) you will have a square that is sometimes dark enough to have mushrooms grow into it, and sometimes too light for them to do so. You will need to place another two rings outside of this, one that will allow mushrooms to grow up diagonally into your grow squares, and one that will allow them to grow down diagonally - however - by placing a ring of cobblestone one above your ring of signs and continuing the grow squares and the seed squares it is possible to continue building the system up as far as the top of the map - if desired - and subsequent levels are far easier to lay out and build than the first.
The second part of this system - redstone - is used to update the grow blocks when they are lit and cause the mushrooms inside to "pop" out of their square and fall. Mushrooms will remain planted when the light level is too high for them to grow, unless the state of their square is checked. This sounds complicated, but all it means is that something about the square next to it needs to change - by placing a ring of redstone torches that will send a signal to the block next to our grow square it becomes possible to have the mushrooms pop out without having to do anything ourselves, and to stop or start this action by using a redstone system.
Generally this will be accomplished by placing a solid block three away from each of our grow spots on the bottom level with redstone running current to it, and placing a torch on the side nearest to our grow spot. We can then alternate solid blocks and torches all the way up the remainder of our system, meaning that while the bottom row needs a large amount of redstone as part of our redstone mechanism each additional row will need only 8 redstone torches.
The problem with this system is that because the lighting is random, dispensing all the mushrooms would require pressing a button many many times. The way we can get past this is by having a cart system, activated remotely, that does nothing but travel back and forth. By placing a cart activated button on this track and hooking it to the bottom layer of our redstone system we can turn the system on and off with only a single lever and have it remain on for as long as we want. Afterward you can build a water channel under your mushroom system to carry them wherever you want, or simply run underneath the automatic farm to collect the mushrooms that drop.
For a video with step by step instructions and visual examples see Fully Automatic Mushroom Farm Tutorial.
Using pistons
A simple fully automated mushroom farm can be built by the use of pistons. First a room of the height 2 is needed. In this room a water stream in the floor of the width 2 is needed. The purpose of this stream is simply to transport the harvested mushrooms out of the room. Mushrooms shall be planted along the bank of this water stream leaving every other block empty. Lastly, pistons are required to be placed facing towards the waterstream. They need to be placed besides the blocks, in which no mushrooms were planted.
The pistons need to be wired to an outside switch, the water stream shall be redirected to your favorite collection point. Then the room needs to be sealed to be completely dark. The only opening should be 1x1 wide, for the water stream. This being the only opening, spawned monsters cannot leave the room. Eventually the mushrooms will spread to the blocks in front of the pistons. Activating the pistons will then harvest the mushrooms and push them into the water stream. The system is reset by deactivating the pistons without any need for replanting.
Higher efficiency can be achieved by multiple arrangements. The system can even be arranged in a room of the height 1, this makes setup more difficult though.
Piston/Glass Based (Dry farming)
The idea here is that mushrooms can also be popped off by causing the block beneath them to change to Glass. Using Pistons you can push 12 blocks of alternating block/Glass rows causing any mushrooms growing on them to pop off.
The basic set up is two sets of pistons facing each other on either side of the seed mushroom row. Upon pushing a button a signal is sent causing the first group to extend popping off the mushrooms. The signal is delayed 12 ticks(3 repeaters) and the second group of pistons then extends resetting the farm.
Generally this is designed for use in the Nether, where "wet" methods are unavailable. Some benefits over other "dry" methods are simplicity and low resource requirements.
Giant Mushroom Farming Outdoors (Without Mycelium)
There is a way to farm mushrooms outside: dig a 1x1 hole where you want your farm to be. Place a bucket of water in the 1x1 hole. Then plant a mushroom in the water and bonemeal it quickly or the mushroom will unplant.
ビデオ
| YouTube([https://youtube.com/watch?v=OfNWtqKMb4o YouTube) |
|---|
HybridCraftによるビデオチュートリアル
History
- Since the 1.6 update, mushrooms will slowly spread to nearby opaque blocks, allowing for the creation of farms. However, the rate at which mushrooms spread is considerably slow; therefore, starting a farm is an ordeal without multiple mushrooms.
- As of Beta 1.8 mushroom spreading is nerfed, so that a mushroom will only spread if there are fewer than 5 mushrooms in an area of 9x9x3 around the original mushroom. This has made Mushroom farming very inefficient and many of the formerly proven methods (notably the "water flushable pentapipe") will not work in 1.8+. However, the addition of Huge Mushrooms provides a faster alternative.
| 新人向け |
| ||||||||||||
|---|---|---|---|---|---|---|---|---|---|---|---|---|---|
| 全般 | |||||||||||||
| チャレンジ |
| ||||||||||||
| 建築 | |||||||||||||
| 生産 |
| ||||||||||||
| エンチャントと製錬 | |||||||||||||
| ブロック破壊 |
| ||||||||||||
| メカニズム |
| ||||||||||||
| サーバー |
| ||||||||||||
| 技術的なチュートリアル |
| ||||||||||||
| 古いチュートリアル |
| ||||||||||||