(→種を植える) |
|||
| (同じ利用者による、間の15版が非表示) | |||
| 1行目: | 1行目: | ||
| − | <!--title: |
+ | <!--title:Pumpkin and melon farming--> |
| + | ここではカボチャとスイカの栽培について、手動、自動それぞれガイドする。他の作物の栽培については[[Farming]]を参照されたし。 |
||
| − | Here are given fuller descriptions and pictures of the various structures found in a village. |
||
| + | <!--This is a tutorial on how to farm pumpkins and melons, both manually and automatically. For other types of farming see [[Farming]].--> |
||
| + | == 成長のしくみ == |
||
| − | == Number and Frequency of Structures == |
||
| + | [[スイカ]]と[[カボチャ]]はどちらも成長の仕方は同じで、同じやり方で生産ができる。成熟すれば作物の安定供給が得られるだろう。 |
||
| − | The number of buildings composing a village can vary, and not every village is composed of all buildings at once. Apart from the well, which is unique and systematic, the number of buildings of each type is randomly generated, and increased in [[superflat]] worlds. Structures are picked from a weighted probability list (libraries are more common than butcher shops). There may be fewer buildings of a given type than the maximum allowed. The number of lamp posts has no restriction, as they are generated where no other buildings can be placed. Roads are found between the buildings of the village and often extend beyond them. |
||
| + | <!--[[Melon]]s and [[pumpkin]]s use essentially the same mechanics for growth and can be easily farmed with the same techniques. Once the plants are mature, they will provide a steady supply of fruit for your needs.--> |
||
| + | === 種をさがす<!--Finding Seeds--> === |
||
| − | {| class="wikitable" style="text-align: center" data-description="Structure distribution" |
||
| + | 栽培を始める前に種が手に入れなければならない。カボチャやスイカの種は廃坑などのチェストから見つかる。あるいは、ワールドに生成されているカボチャやスイカからクラフトしてもいいだろう。 |
||
| − | |- |
||
| + | <!--To begin farming, seeds must first be found. You can either find seeds in chests, or find whole melons or pumpkins and craft them into seeds.--> |
||
| − | ! Structure !! Weight !! Default maximum<br>range !! Superflat maximum<br>range |
||
| + | * カボチャはどの[[バイオーム]]にも草ブロックの上に自然に生成されている。生成確率は1[[チャンク]]あたり1/32である。<!--* Pumpkins can be found growing "wild" in any [[biome]] with grass.--><ref group="note">このとき、ランダムな場所が選択され、カボチャの周囲15×15×7の領域の下に草ブロックになっているランダムな空気ブロックを探す試みが64回行われる。<!--Each [[chunk]] has a 1/32 chance of attempting to spawn pumpkins when the chunk is generated; a random point is chosen and 64 attempts are made to find a random air block with grass beneath in a 15×15×7 region around the point in which to place a pumpkin. Note the random point could be far in the air or far underground, greatly reducing the chances of pumpkins being able to be placed.--></ref> |
||
| − | |- |
||
| + | * スイカは[[ジャングル]]バイオームに自然に生成される。<!--* Melons can be found growing "wild" in [[jungle]]s.--><ref group="note">生成されたジャングルのチャンクのうちランダムなポイントが選ばれ、下が草ブロックになっている、高い草やツタといった置き換え可能なブロックを探す試みが64回行われる。<!--For each jungle chunk generated a random point is chosen and 64 attempts are made to find a random replaceable block (e.g. air, long grass, or vines) with grass beneath in a 15×15×7 region around the point in which to place a melon. Note the random point could be far in the air or far underground, greatly reducing the chances of melons being able to be placed.--></ref> |
||
| − | | Hut <!-- ViSmH --> || 3 || 2 – 5 || 3 – 8 |
||
| + | * カボチャの種とスイカの種はどちらも[[廃坑]]の[[チェスト付きトロッコ]]から見つかる。<!--Pumpkin and melon seeds can both be found in [[minecarts with chests]] inside [[abandoned mineshaft]]s --> |
||
| + | |||
| + | <references group="note"/> |
||
| + | |||
| + | もし、手元に種がなくてもスイカやカボチャそのものがあったら、そのままクラフトしてみるとよい。すると、4つの種が得られるだろう。また、設置されたスイカを破壊するといくつかのスイカスライスが得られる。これをクラフトすることで種が1つ手に入る。<!--If you do have a whole pumpkin or melon, but no seeds, simply put the whole pumpkin in the crafting area and you will get 4 seeds. The melon drops melon slices when mined, which yield 1 seed each when put in the crafting area.--> |
||
| + | |||
| + | === 種を植える === |
||
| + | 種を無事に入手できたらそれを[[耕地]]に植えてみよう。すると、耕地から茎が生え、枯れ木色になるまで成長する。茎の成長は[[骨粉]]で促すことも可能だ。ここまで成長すると、茎はもう成長しないが、隣接する空間が、地面が[[土]]ブロックや[[草ブロック]]、[[ポドゾル]]であれば、カボチャやスイカの実がなる。この実は茎を壊さない限り何度でも実る(茎を壊した場合、1~4個の種を落とす)。 |
||
| + | ただし、茎とは違い、いくら骨粉を与えても結実を早めることはない。 |
||
| + | |||
| + | 実が成ったら、いよいよ収穫だ。収穫は素手でもできるが、[[斧]]を使うのが一番早い。[[剣]]でも早く回収できるが耐久値が2減ってしまう。回収する際、カボチャはブロックのまま穫れるが、スイカは3~7個のスイカスライスとなって回収され、ブロックのまま収穫するには[[シルクタッチ]]のエンチャントが必要になる。 |
||
| + | |||
| + | また、カボチャとスイカはピストンで動かされるとアイテム化するという性質を持つ(地面を動かしてもアイテム化する)。これを利用することで、自動栽培ができる。 |
||
| + | |||
| + | * Thus, hydrated [[farmland]] adjacent increases growth rates of stems and production rate of fruit, having the same stem type adjacent to the stem (unless in rows) reduces growth rates and fruit production, light level 9 in the block above the stem is required for any growth, etc. |
||
| + | * The maximum probability of fruit production from a single stem would therefore require a stem in hydrated farmland with hydrated farmland on all eight sides, with four of those farmland blocks remaining unplanted (the corners may be planted with some other crop). Practical farms will often accept reduced per-plant production rates (⅔, ⅓, or even ⅙ of the maximum) for greater space efficiency and ease of harvest. |
||
| + | |||
| + | {{notelist}} |
||
| + | |||
| + | == Manual farms == |
||
| + | |||
| + | This section contains suitable layouts for farms that must be manually harvested. The percentages given are space efficiencies. Parenthesized values are theoretical maximums, which assume that there are free blocks surrounding the farm for the border plants to place melons. The maximum possible efficiency for any melon or pumpkin farm is 50% (one fruit per stem). Spaces where a fruit can occupy two or more stems will reduce the efficiency and yield. Question-mark blocks indicate that anything could be put in that spot—perhaps lighting, or other crops such as [[wheat]], [[carrot]]s, or [[potato]]es. You will probably want to cover the water with a [[slab]], a [[lily pad]], or a [[carpet]]. |
||
| + | |||
| + | === Simple farms === |
||
| + | |||
| + | The following grids will give you different availabilities for designs of pumpkin and melon farms. |
||
| + | |||
| + | If you just want a quick, compact farm, use design '''D''' below. '''C''' and '''D''' have slightly lower efficiency, but both fit on a "standard farm plot", and are easy to harvest. Of those two, '''D''' likely has a faster growth rate due to the separated rows of stalks, but the middle row should ''not'' be open dirt/grass or farmland (or more stalks), because any fruit spawned there can tie up two stems. For '''C''', the middle row can be anything except more stalks, for the same reason. |
||
| + | |||
| + | Design '''A''' is slightly larger and maximizes space efficiency. It can be tiled for larger farms, but alternate rows should be mirrored top-to-bottom to keep the efficiency. Design '''B''' is least efficient, but fits in a slightly smaller plot. |
||
| + | |||
| + | {| class="wikitable" data-description="Four farm designs" |
||
| + | |[[File:Melon Grid A.png|thumb|180px|Farm Plan A, 9×10, 48.88%]] |
||
| + | <!-- Grid A |
||
| + | {{BlockGrid |
||
| + | |%=stem |.=dirt|w=water|x=air |
||
| + | |%%%%%%%%% |
||
| + | |......... |
||
| + | |......... |
||
| + | |%%%%%%%%% |
||
| + | |%%%%w%%%% |
||
| + | |....?.... |
||
| + | |......... |
||
| + | |%%%%%%%%% |
||
| + | |%%%%%%%%% |
||
| + | |......... |
||
| + | }} |
||
| + | 9x10@48.88% |
||
| + | --> |
||
| + | |[[File:Melon Grid B.png|thumb|Farm Plan B, 9×8, 43.21%]] |
||
| + | <!-- Grid B |
||
| + | {{BlockGrid |
||
| + | |%=stem |.=dirt|w=water|x=air |
||
| + | |......... |
||
| + | |%%%%%%%%% |
||
| + | |%%%%?%%%% |
||
| + | |....w.... |
||
| + | |......... |
||
| + | |%%%%%%%%% |
||
| + | |%%%%%%%%% |
||
| + | |......... |
||
| + | }} |
||
| + | 9x8@48.61% |
||
| + | --> |
||
|- |
|- |
||
| + | |[[File:Melon Grid C.png|thumb|Farm Plan C, 9×9, 44.44%]] |
||
| − | | Small house <!-- ViSH --> || 4 || 2 – 4 || 3 – 6 |
||
| + | <!-- Grid C |
||
| + | {{BlockGrid |
||
| + | |%=stem |.=dirt|w=water|x=air |
||
| + | |......... |
||
| + | |%%%%%%%%% |
||
| + | |%%%%%%%%% |
||
| + | |......... |
||
| + | |????w???? |
||
| + | |......... |
||
| + | |%%%%%%%%% |
||
| + | |%%%%%%%%% |
||
| + | |......... |
||
| + | }} |
||
| + | 9x9@44.44% |
||
| + | --> |
||
| + | |[[File:Melon Grid D.png|thumb|Farm Plan D, 9×9, 44.44%]] |
||
| + | <!-- Grid D |
||
| + | {{BlockGrid |
||
| + | |%=stem |.=dirt|w=water|x=air |
||
| + | |%%%%%%%%% |
||
| + | |......... |
||
| + | |......... |
||
| + | |%%%%%%%%% |
||
| + | |????w???? |
||
| + | |%%%%%%%%% |
||
| + | |......... |
||
| + | |......... |
||
| + | |%%%%%%%%% |
||
| + | }} |
||
| + | 9x9@44.44% |
||
| + | --> |
||
| + | <!-- |
||
|- |
|- |
||
| + | |[[File:Melon Grid E.png|thumb|Farm Plan E, 9×9, 22.22%-33.33% (43.20%)]] |
||
| − | | Large house <!-- ViTRH --> || 8 || 0 – 3 || 1 – 5 |
||
| − | + | --> |
|
| + | <!-- |
||
| − | | Butcher's shop <!-- ViPH --> || 15 || 0 – 2 || 1 – 3 |
||
| + | Grid E |
||
| − | |- |
||
| + | {{BlockGrid |
||
| − | | Library <!-- ViBH --> || 20 || 0 – 2 || 1 – 3 |
||
| + | |%=stem |.=dirt|w=water|x=air |
||
| − | |- |
||
| + | |.%..%..%. |
||
| − | | Small farm <!-- ViF --> || 3 || 2 – 4 || 3 – 6 |
||
| + | |%?%%?%%?% |
||
| − | |- |
||
| + | |.%..%..%. |
||
| − | | Large farm <!-- ViDF --> || 3 || 1 – 4 || 2 – 5 |
||
| + | |.%..%..%. |
||
| − | |- |
||
| + | |%?%%w%%?% |
||
| − | | Blacksmith <!-- ViS -->|| 15 || 0 – 1 || 0 – 2 |
||
| + | |.%..%..%. |
||
| − | |- |
||
| + | |.%..%..%. |
||
| − | | Church <!-- ViST --> || 20 || 0 – 1 || 1 – 2 |
||
| + | |%?%%?%%?% |
||
| + | |.%..%..%. |
||
| + | }} |
||
| + | 9x9@22.22%-33.33% (43.20%) |
||
| + | --> |
||
| + | <!-- |[[File:Melon Grid F.png|thumb|Farm Plan F, 9×9, 29.62% (44.44%)]] |
||
| + | --> |
||
| + | <!-- Grid F |
||
| + | {{BlockGrid |
||
| + | |%=stem |.=dirt|w=water|x=air |
||
| + | |%..%%%..% |
||
| + | |.%%...%%. |
||
| + | |.%%...%%. |
||
| + | |%..%%%..% |
||
| + | |%..%w%..% |
||
| + | |%..%%%..% |
||
| + | |.%%...%%. |
||
| + | |.%%...%%. |
||
| + | |%..%%%..% |
||
| + | }} |
||
| + | 9x9@29.62% |
||
| + | (49.38%) |
||
| + | --> |
||
|} |
|} |
||
| + | === Very large farms === |
||
| − | == 村の構造物 == |
||
| + | Most of the above farms can be tiled to make larger farms, though in some cases, alternate rows or columns of the plots should be flipped for best results. This farm represents an expansion of design A (turned sideways), with the left column of plots reversed. (It also shows the farmland border for the whole farm.) The basic plots could be repeated further, expanding the farm in units of 9×9. Note that this design aims to make sure that each fruit only occupies one stem - as it increases in size, the efficiency approaches 49% |
||
| − | ここでは草原に生成されるものについて説明する。他のバイオームの村では、砂漠ではほとんどの建物で木材と丸石が砂岩になるように、いくつかのブロックが対応するブロックに置き換えられる。それについては[[村#素材のバリエーション|村]]の記事を参照してほしい。<!--The descriptions below apply to plains villages. In other village types, some of the blocks are [[Village#Block substitution|changed]], for example desert villages use sandstone in place of wood and cobblestone in most structures.--> |
||
| + | [[File:Large farm grid.png]] |
||
| − | 村の建物の中にはテーブルを備えているものがある。このテーブルはフェンスと感圧板で出来ているが、[[Bedrock Edition]] と [[Legacy Console Edition]] では感圧板の代わりに茶色のカーペットが置かれている。 |
||
| − | <!--"Tables" are made of brown carpets{{Only|Bedrock|Legacy Console}}instead of wooden pressure plates.--> |
||
| + | === Multi-level farms === |
||
| − | 村の建物と畑は絶対に宙づりにならないようになっている。空中に生成されるような場合では、建物なら丸石が、畑なら土が地面の高さまで生成される。 |
||
| − | <!--Village buildings and farms never generate "floating", instead filling in a foundation down to ground level when necessary. Buildings generate a cobblestone foundation, while farms generate dirt.--> |
||
| + | While the above designs all use one layer, the most efficient (49.38%) 9×9 farm can be created by using two layers. Design is based on design D, and cobblestone indicates spaces that will be covered (with dirt) by the layer above. |
||
| − | {| class="wikitable" |
||
| + | |||
| − | |+ 村の構造物の種類 |
||
| + | When replicated over a larger area, design G has spots where you will need to jump. Design H avoids that but keeps the same efficiency. For design H, the water source must be placed with care so that it won't spread into the "corridors". However, if there is the usual pit in the bottom layer (and matching hole above), the source block can be placed against one of the upper blocks, or 2 blocks above that layer. The position of the melon stems and dirt/grass/farmland blocks in the two farming layers can be swapped without losing efficiency. |
||
| − | ! style="width:7%"|名前 |
||
| + | |||
| − | ! 説明 |
||
| + | {| class="wikitable" data-description="Two farm designs" |
||
| − | ! 画像 |
||
| + | |[[File:Melon Grid G1.png|thumb|Farm Plan G bottom layer, 9×9, 29.62% (44.44%)]] |
||
| − | |- |
||
| + | <!-- {{BlockGrid |
||
| − | | 木の小屋 {{anchor|Wood Hut}}<!-- ViSmH --> |
||
| + | |%=stem |.=dirt|w=water|x=air|c=cobblestone |
||
| − | | オークの[[原木]]とオークの[[木材]]でできた小屋で丸めの屋根と土の床があり、[[板ガラス]]でできた屋根がある。3つに2つはフェンスと木材の感圧板([[Bedrock Edition]]と[[Legacy Console Edition]]では茶色の[[カーペット]])でできたテーブルが置いてある。生成時、ランダムな職業の村人が1人スポーンする。<!--Wood Huts are made of oak [[wood]] and oak [[wooden planks]], with a rounded roof, a dirt floor, and [[glass pane]]s for windows. {{frac|2|3}} have a fencepost and pressure plate (brown carpet{{Only|Bedrock|Console}})'table'. They will generate one villager of a random profession inside.--> |
||
| + | |%%%%c%%%% |
||
| − | | [[File:villagehut1.png|400px|center]] |
||
| + | |....c.... |
||
| − | |- |
||
| + | |....c.... |
||
| − | | 小さな家 {{anchor|Small House}} |
||
| + | |%%%%c%%%% |
||
| − | | 大きさは木の小屋と似ているが、木材が木の小屋よりも多く、原木が少なくなっている。また、床が丸石になっている。屋上は平坦になっており、半数はフェンスで囲われていてバルコニーのようになっており、はしごで行き来できる。木の小屋と同様に生成時に村人が1人スポーンするがドアがないため、村から家と認識されない。<!--Small Houses are similar in size to wood huts, but made with more planks, fewer wood blocks, and a [[cobblestone]] floor. Their roof is flat, and 50% have [[fence]]d off balcony with access provided by [[ladder]]s. As with wood huts, they generate with one villager. Unlike most other buildings, small houses have no door and so do not count as homes for villagers.--> |
||
| + | |ccccwcccc |
||
| − | | [[File:villagehut2.png|400px|center]] |
||
| + | |%%%%c%%%% |
||
| − | |- |
||
| + | |....c.... |
||
| − | | 大きな家 {{anchor|Large House}} |
||
| + | |....c.... |
||
| − | | 小さな家と同じ素材でできているがあちらよりも大きく、L字型になっている。生成時に村人が2人生成される。充分に照らされておらず、敵対的Mobがスポーンしてしまう。[[Bedrock Edition]] や [[Legacy Console Edition]] では氷原バイオームや極寒タイガに生成された場合、中にチェストが置かれている。<!--Large Houses are composed of the same materials as small houses. However, they are much larger in size and are L-shaped. Two villagers generate in these houses. The house is not lit well enough to prevent hostile mob spawning. A [[chest]] {{Only|bedrock|console}}will be generated inside the building, if the village generates in the [[ice plains]]/[[cold taiga]] biome.--> |
||
| + | |%%%%c%%%% |
||
| − | | [[File:villagehouse1.png|400px|center]] |
||
| + | }} --> |
||
| − | |- |
||
| + | ||[[File:Melon Grid G2.png|thumb|Farm Plan G upper layer, 9×9]] |
||
| − | | 肉屋{{anchor|Butcher's Shop}} |
||
| + | <!-- {{BlockGrid |
||
| − | | 木材の[[階段]]からなる小さな座席とその間にはフェンスと感圧板([[Bedrock Edition]] と [[Legacy Console Edition]] では茶色のカーペット)からなるテーブルがあり、その近くには重ね置きした石のハーフブロックで出来たカウンターを備えている。建物の裏手にはフェンスで囲われた庭があり、ドアを通じて行き来できる。生成時に内部から肉屋の村人が1人とランダムな職業を持った村人が1人出現する。<!--Butcher's Shops have small seating areas made of two wooden [[stairs]] and between them a pressure-plate (carpet {{Only|bedrock|console}})-on-fence table. Nearby is a double [[stone slab]] counter. A fenced off backyard is located behind the building and is accessed through a door. One butcher villager and one villager with a random profession generate in the shop.--> |
||
| + | |%=stem |.=dirt|w=water|x=air |
||
| − | | [[File:villagehouse2.png|400px|center]] |
||
| + | |xxxx%xxxx |
||
| − | |- |
||
| + | |xxxx.xxxx |
||
| − | | 図書館{{anchor|Library}} |
||
| + | |xxxx.xxxx |
||
| − | | 他の建物より細長い建物で、木材の階段を並べたベンチや2つ並んだフェンスと木材の感圧板のテーブル、そして天井付近に本棚が並んでいる。また、窓が他の建物よりも大きく、隅には[[作業台]]がある。生成時に司書が1人スポーンする。<!--Libraries are longer and narrower than other buildings, and have a row of wooden stairs as a bench in front of two pressure plate-on-fence tables, with a row of [[bookshelves]] above. They also have larger windows than any other kind of buildings. A [[crafting table]] is located in the corner. One librarian villager generates in each library.--> |
||
| + | |xxxx%xxxx |
||
| − | | [[File:villagehouse3.png|200px|center]] |
||
| + | |%..%w%..% |
||
| − | |- |
||
| + | |xxxx%xxxx |
||
| − | | 農場{{anchor|Farm}} |
||
| + | |xxxx.xxxx |
||
| − | | 大きいものと小さいものがあり、小さいものは2×7の大きさで、水を隔てて作物が並んでいる。大きいものは小さいものを2つ並べたようになっている。どちらも外周は原木で縁取られる。大きいものは真ん中を通り抜けることができる。それぞれの作物は50%が[[小麦]]で20%が[[ニンジン]]と[[ジャガイモ]]で、10%が[[ビートルート]]になっている。生成時、これらの成長具合はランダムになっている。ここでは生成時に村人はスポーンしない。また、[[バイオーム#Ice Plains|氷原]]バイオームや[[バイオーム#Cold Taiga|極寒タイガ]]で生成された場合、作物は一切栽培されていない。<!--Farms can come in small and large varieties. The small farms contain two 2×7 plots of crops with a row of water separating them, while the large farms are essentially two adjacent small farms. Each plot is planted entirely with one crop: 50% are [[wheat]], 20% are [[carrot]]s, 20% are [[potato]]es, and 10% are [[beetroot]]. When generated, the crops are at a random stage of growth. The farms are bordered by wooden logs, and in large farms, a walkway of logs also runs down the middle. Farms do not generate any villagers. If the village generates in the [[Ice Plains]]/[[Cold Taiga]] biome, farms won't include any crops.--> |
||
| + | |xxxx.xxxx |
||
| − | | [[File:villagefarm.png|400px|center]] |
||
| + | |xxxx%xxxx |
||
| − | |- |
||
| + | }} |
||
| − | | 井戸{{anchor|Well|Village Well}} |
||
| + | --> |
||
| − | | 各村に1つのみ生成される。2×2の大きさの水で満たされた池で丸石で囲まれており、フェンスで支えられた丸石の屋根をもつ。通常、井戸の深さは10ブロックだが[[スーパーフラット]]でClassic Flatを選んだ場合、ワールド自体の標高が低いため4ブロックのみとなる。井戸の周りには[[草の道]]が円状に存在する。これは他のバイオームであっても同じである。井戸は村が生成される時に最初に生成される構造物で、その外側に道がのび、のびた道に沿って建物が生成される。<!--Wells are 2×2 pools filled with water, surrounded by cobblestone and have small roofs of cobblestone supported by fences. The wells are normally 10 blocks deep, but are only 4 blocks deep in [[Superflat#Presets|Classic Flat]] worlds due to the low elevation. There is only one well in each village. [[Grass path]] (which is not substituted with other blocks in different biomes) circles the well. When the village is generated, the well is placed first, roads are generated outwards from it, and other structures are generated along the roads.--> |
||
| − | | [[File:villagewell.png|200px|center]] |
||
| − | |- |
||
| − | | 鍛冶屋{{anchor|Blacksmith}} |
||
| − | |主に丸石でできた建物(これは他のバイオームであっても変わらない)で、溶岩から離した原木や木材の壁と石の[[ハーフブロック]]で裏打ちされた屋根がある。正面には日よけ付きの玄関を備えており、日よけはフェンスで支えられている。この玄関には一方を鉄格子で囲まれた小さな溶岩溜まりと2つ重ねたかまど、そして重ね置きした石のハーフブロックがある。恐らくここで作業を行うのだろう。玄関は村の道から3つの丸石の階段で行き来することができる。鍛冶屋にはドアがないため、村からは家として数えられない。もしドアを設置したなら村人は建物に入ることなく玄関に集まるだろう。建物開口部から後室へ行くと様々なアイテムの入ったチェストが置かれている。生成時に内部から鍛冶屋の村人から1人出現する。<!--Blacksmiths are primarily made out of cobblestone (which is not substituted with other blocks in different biomes), with wooden walls on the far side (away from the lava) and stone slabs lining the roof. Blacksmiths do not have a door, making it not count as a house for villagers. If a door is added, villagers will gather on the porch rather than going inside the building. On the front of the building is a small porch with an awning supported by fences. Three cobblestone stairs lead up to the porch from the road. On the porch is a small pool of lava, surrounded on one side by iron bars. There are also two furnaces and a work table made of one double stone slab. An opening leads to a back room with a small room and a small chest containing a variety of items. One blacksmith villager generates in the building.--> |
||
| − | | [[File:villageblacksmith.png|200px|center]] |
||
| − | |- |
||
| − | | 教会 {{anchor|Church}} |
||
| − | | この建物の外装は丸石と丸石の階段でのみでできており、どのバイオームであっても他のブロックで置き換わることはない。中は3階建てで、はしごで行き来するようになっている。また、板ガラスの窓が備わっており、屋上はバルコニーのようになっている。ここでは生成時に牧師が1人スポーンする。<!--Churches are buildings made purely of cobblestone (which is not substituted with other blocks in different biomes) and cobblestone stairs, with a small 3 floor tower equipped with ladders and glass panes to a balcony on the top. One priest villager generates in the church.--> |
||
| − | | [[File:villagechurch.png|150px|center]] |
||
| − | |- |
||
| − | | 街灯{{anchor|Lamp Post}} |
||
| − | | 3本重ねのフェンスの上に黒色の[[羊毛]]があり、その周りに4本の[[松明]]が置かれたもので、村の至る所にある。ゾンビの村ではこの松明が取り除かれている。<!--Lamp Posts can be found throughout villages, made of stacked fences topped with black [[wool]], to which four [[torch]]es are affixed, one on each side. Zombie villages generate lamp posts without torches. --> |
||
| − | | [[File:villagelamp.png|100px|center]] |
||
| − | |- |
||
| − | | 道 {{anchor|Road}} |
||
| − | | 村の建物間を繋ぐもので、周囲の地形に応じて変わる。草ブロックなら[[草の道]]、水や溶岩なら[[木材]]、それ以外なら[[砂利]]道になり、その下に[[丸石]]が敷かれる。<!--Roads connect all of the buildings in a village. Roads are [[grass path]]s where they replace [[grass block]]s, oak [[planks]] where they replace water or lava, or [[gravel]] over [[cobblestone]] where they replace other blocks.--> |
||
| − | | [[File:villageroad.png|400px|center]] |
||
|} |
|} |
||
| + | {| class="wikitable" data-description="Two more designs" |
||
| − | {{environment}} |
||
| + | |[[File:Melon Grid H1.png|thumb|Farm Plan H bottom layer, 9×9, 29.62% (44.44%)]] |
||
| + | <!-- {{BlockGrid |
||
| + | |%=stem |.=dirt|w=water|x=air|c=cobblestone |
||
| + | |%%%%%%%%% |
||
| + | |......... |
||
| + | |......... |
||
| + | |%%%%%%%%% |
||
| + | |ccccwcccc |
||
| + | |%%%%%%%%% |
||
| + | |......... |
||
| + | |......... |
||
| + | |%%%%%%%%% |
||
| + | }} |
||
| + | --> |
||
| + | ||[[File:Melon Grid H2.png|thumb|Farm Plan H top layer, 9×9]] |
||
| + | <!-- {{BlockGrid |
||
| + | |%=stem |.=dirt|w=water|x=air |
||
| + | |xxxxxxxxx |
||
| + | |xxxxxxxxx |
||
| + | |xxxxxxxxx |
||
| + | |xxxxxxxxx |
||
| + | |%..%w%..% |
||
| + | |xxxxxxxxx |
||
| + | |xxxxxxxxx |
||
| + | |xxxxxxxxx |
||
| + | |xxxxxxxxx |
||
| + | }} --> |
||
| + | |} |
||
| + | {{-}} |
||
| + | [[File:Pumpkin Farm.png|thumb|An example of the Plan D simple farm.]] |
||
| + | |||
| + | === Rapid-harvest farms === |
||
| + | |||
| + | The above layouts are optimized for high efficiency, at the cost of speed. They work best for infrequent harvests, with plenty of time for the field to regrow in between. For frequent harvests, the first following layout may be better suited; if harvested once per day-and-night cycle, it yields about 17 fruits per harvest (as opposed to about 13 fruits for the above designs). The second layout goes even further in that direction—it does not use space efficiently, but instead gives each stem 2–4 potential places to spawn a pumpkin or melon, encouraging quicker initial growth at the cost of a clumsier design and reduced long-term yield. |
||
| + | |||
| + | {| class="wikitable" data-description="Two farm designs" |
||
| + | |[[File:Melon Rapid-Harvest Grid.png|thumb|Rapid-harvest Farm 1]] |
||
| + | <!-- |
||
| + | {{BlockGrid |
||
| + | |%=stem |.=dirt|w=water|g=rose |
||
| + | |......... |
||
| + | |%%%%%%%%% |
||
| + | |......... |
||
| + | |....g.... |
||
| + | |%%%%w%%%% |
||
| + | |....g.... |
||
| + | |......... |
||
| + | |%%%%%%%%% |
||
| + | |......... |
||
| + | }} |
||
| + | --> |
||
| + | |[[File:Pumpkin Farm Grid 4.png|thumb|200 px|Rapid-Harvest Farm 2]] |
||
| + | |} |
||
| + | |||
| + | == Semi-automatic farms == |
||
| + | |||
| + | Melons and pumpkins are both "dropped" when a piston of any kind pushes them, leading the possibility for auto-harvesting melon farms. A simple Auto-Harvester would be made by placing an upward-facing [[Sticky Piston|sticky piston]] under each farmland block reserved for melons. Alternately, regular pistons can be used (refer to Design 8 to see how). When the pistons are powered, they destroy all of the melons for pickup by the player. Using this technique, one can make a semi automatic farm as shown [[Tutorials/Automatic farming|here]], but it will take up extra space for the mechanisms. |
||
| + | |||
| + | The following designs are all possible ways to make a semi-automatic farm: |
||
| + | |||
| + | === Design 1 === |
||
| + | |||
| + | [[File:Autoharvestmelonfarm.gif|A basic Auto-Harvester Melon farm using Sticky Pistons]] |
||
| + | |||
| + | === Design 2 === |
||
| + | |||
| + | {{CollapsedVideo|chgqDir_990|A semi-automatic harvesting melon/pumpkin farm.}} |
||
| + | |||
| + | === Design 3 === |
||
| + | |||
| + | {{CollapsedVideo|RvrwpUmKi0o|A semi-automatic harvesting pumpkin farm.}} |
||
| + | |||
| + | === Design 4 === |
||
| + | |||
| + | {{CollapsedVideo|sYHxxXQZYRk|A semi-automatic harvesting melon farm.}} |
||
| + | |||
| + | === Design 5 === |
||
| + | |||
| + | The following melon/pumpkin farm uses a pressure plate to rapidly pulse a sticky piston. |
||
| + | {{CollapsedVideo|BMni-3p6858|Pressure plate activated farm.}} |
||
| + | |||
| + | === Design 6 === |
||
| + | |||
| + | A compact semi automatic pumpkin and/or melon slice generator, with notification noise: |
||
| + | <gallery> |
||
| + | File:pumpkin_generator_1.png|Layer 1 |
||
| + | File:pumpkin_generator_2.png|Layer 2 |
||
| + | File:pumpkin_generator_3.png|Layer 3 |
||
| + | </gallery> |
||
| + | This design uses 2 stems with 2 spawn places and a notification note block for each. Wooden planks in layer 1 define note block's tone and can be replaced with other blocks according to your preferences. Any opaque block can be used instead of cobblestone. Jack-o-lantern can be replaced with glowstone. Maximum delay is recommended for the redstone repeaters. |
||
| + | |||
| + | === Design 7 - Stackable === |
||
| + | |||
| + | The following design sacrifices space efficiency in order to fully automate harvesting and allow ''massive'' expansion: The tower can be expanded up to the build limit and/or down to bedrock, potentially yielding nearly a thousand growing spaces per tower. |
||
| + | |||
| + | The total area of the farm is 13 blocks by 7 blocks, with alternating piston and farm layers. Its height is 2 blocks, plus 2 more for each "crop layer" of 8 growing spaces. You will need the following materials to make it: |
||
| + | |||
| + | * 16 dirt |
||
| + | * 8 jack-o-lanterns, or glowstone (for lighting) |
||
| + | * 8 iron |
||
| + | * 28 redstone + an extra 10 - 13 |
||
| + | * At least 50 generic blocks per crop layer, an extra 43 blocks for the build as a whole. |
||
| + | |||
| + | The farmland is hydrated by water flowing down from above. A pressure plate at the end of the collection area on the bottom activates a redstone torch tower, which in turn activates each piston layer. The harvest falls down the empty middle area into flowing water at the bottom layer, and is channelled to the player standing on the pressure plate. |
||
| + | |||
| + | Starting tips: |
||
| + | * To speed up collection, place ice blocks under the watercourse. |
||
| + | * The farm can be lit from within by glowstone as shown, or much more cheaply by jack-o-lanterns. Unfortunately, you can't place a jack-o-lantern directly onto a piston, so if you will need to put temporary blocks in place of the pistons, put the jack-o-lanterns on top of those, and then replace the temporary blocks with the pistons. |
||
| + | * The pressure plate can be replaced with a hopper or two, leading to a chest or two south of it. Then the redstone can be triggered with a switch anywhere along its length. However, a sufficiently tall farm may produce enough goods to overwhelm the hopper. (750 items—call it a dozen stacks—will take 5 minutes to absorb, so additional stacks may expire. Twenty or so levels of melons could do that, or most of a hundred levels of pumpkins.) |
||
| + | |||
| + | See the following steps to build the farm itself: |
||
| + | # Start with the base layer, which is a modified farm layer. The farmland squares should be planted with your seeds, while the dirt is where pumpkins or melons will grow. |
||
| + | * If you are using jack-o-lanterns for light, remember the temporary blocks as noted above. |
||
| + | # Place a piston layer on top of that. This completes your first crop layer, and for the bare-minimum "tower", you could go on to the cap and water layers from here. More likely, continue to: |
||
| + | # Alternate farm and piston layers, as many as you want. Each pair is a crop layer. This is the expandable section, and you are limited only by resources. |
||
| + | # After the last piston layer, build the cap layer instead of another farm layer. The black wool indicates temporary blocks (any solid, non-falling, block will do) which you will remove after placing the water on the top level. |
||
| + | # Last of all, build the top layer, place the water, and mine out those temporary blocks. For the top-most layer, all the water blocks are sources. (The Art of the Bucket will assist in filling them quickly.) |
||
| + | |||
| + | Schematics:<br> |
||
| + | {{Schematic help}} |
||
| + | {{-}} |
||
| + | {{loadPage|Tutorials/Pumpkin and melon farming/Stackable PMF 1|Base Layer|h4}} {{-}}{{loadPage|Tutorials/Pumpkin and melon farming/Stackable PMF 2|Piston and Farm Layers|h4}} |
||
| + | {{-}} |
||
| + | {{loadPage|Tutorials/Pumpkin and melon farming/Stackable PMF 3|Cap and Water Layers|h4}} |
||
| + | {{-}} |
||
| + | |||
| + | See the following video for a similar design: |
||
| + | {{CollapsedVideo|kDNr1csDiow|Design by Panda4994}} |
||
| + | |||
| + | === Design 8 - Using Regular Pistons and A Redstone Timer === |
||
| + | |||
| + | {{CollapsedVideo|wzH_FEvK0tI|Multi-Crop Farm Design}} |
||
| + | |||
| + | == 完全自動栽培<!--Fully automatic farms--> == |
||
| + | |||
| + | 全自動栽培とも呼ばれる。これは完成してしまえば収穫と回収の際何もしなくてもよい。動作させるにはピストンとレッドストーンが必要になり、一般的に手動や半自動のものよりもコストが高くなる。 |
||
| + | <!--These farms require no player interaction for the harvesting and collection of pumpkins or melons after being built. Fully automatic farms require pistons and redstone to function, and are generally more expensive to build than manual or semi-automatic pumpkin and melon farms.--> |
||
| + | |||
| + | 全自動栽培の起動には以下の3通りがある。 |
||
| + | * 一定の時間になったら起動するもの。ホッパークロックや日照センサーを使ってできる。 |
||
| + | * [[チュートリアル/ブロック更新検出器|BUD]]か[[オブザーバー]]を用いたもの。隣接するブロックの更新で起動する。 |
||
| + | * カボチャやスイカが生成されて初めて完成するような単純なレッドストーン回路を作成する。<!--Farms are triggered automatically in one of three ways. |
||
| + | # By a system based on time. You can use either a redstone/hopper clock or a daylight sensor for this. |
||
| + | # By making [[Tutorials/Block update detector|bud switches]], or placing [[observer]]s, that detect when an adjacent block updates. |
||
| + | # Using a simple redstone circuit that completes when a pumpkin or melon grows.--> |
||
| + | |||
| + | 回収は以下の組み合わせで行う。 |
||
| + | # 水流 |
||
| + | # ホッパー |
||
| + | # ホッパー付きトロッコ |
||
| + | <!--Pumpkins and melons are collected in a combination of the following. |
||
| + | # Water streams. |
||
| + | # Hoppers. |
||
| + | # Hopper minecarts.--> |
||
| + | |||
| + | === Design 1 === |
||
| + | |||
| + | このやり方は、カボチャ1つずつにピストンを1つ使い、BUDを利用しない。5×5の面積が必要。 |
||
| + | <!--This design requires only 1 piston per pumpkin stem, and doesn't require a bud switch. This pumpkin farm fits within a 5x5 area and is simple to build.--> |
||
| + | |||
| + | {{CollapsedVideo|hJf6CragQvA|Jioge's fully automatic farm}} |
||
| + | |||
| + | === Design 2 === |
||
| + | |||
| + | The following melon/pumpkin farm is completely modular and uses a dropper/hopper combo to detect melon growth. Believed to have the highest efficiency of the fully automatic farms. |
||
| + | {{CollapsedVideo|fL7MEDe0XxE|Fully automatic modular melon/pumpkin farm.}} |
||
| + | |||
| + | === Design 3 === |
||
| + | |||
| + | To make this design, you need to first find a small, flat area to build in. Then, start building the farm with the following steps: |
||
| + | |||
| + | # Start by placing a water source with a [[bucket]], and tilling the grass nearby it. |
||
| + | |||
| + | # Block all but one sides with any block, where the stone bricks are in the image to the right. After that is done, place a '''sticky''' piston two blocks below the area you did not cover. Place any solid block where the grass block is shown, and connect it to a [[redstone torch]], make sure it is facing the same direction as the picture is. |
||
| + | |||
| + | # Place a [[redstone repeater]] facing away from the redstone torch and pointing towards where your melon/pumpkin will grow. Make a loop around the perimeter with redstone, and the occasional repeater may be necessary, depending how large you are making the structure. |
||
| + | |||
| + | # You can optionally add a [[note block]] so that you know when the pumpkin or melon is done (see the picture below) |
||
| + | |||
| + | An additional feature for ease of collecting is to push the pumpkin item or melon slices into a canal. To do this, wire the underground piston's power to power another sticky piston one block above the plant and a block away opposite the water and put a block on its arm (using just the piston arm to push could cause the item(s) to not be pushed). A delay may be necessary for this piston to avoid bugs involving pushed blocks becoming unstuck. Make sure to put a longer delay on the repeater going into the pumpkin or melon. Additionally, several blocks must be placed to ensure each item has nowhere to go but into the water. |
||
| + | |||
| + | After you finish, plant the melon or pumpkin seeds (If you already haven't), and wait for your first harvest. |
||
| + | |||
| + | [[File:Auto-slicing Melon and Pumpkin Farm with redstone.png|none|thumb|Design of auto melon and pumpkin farm]] |
||
| + | |||
| + | === Design 4 === |
||
| + | |||
| + | This farm is very small, has no sticky pistons, and is resource friendly. It uses a BUD switch to determine if a pumpkin/melon has matured and then activates a piston to break it and send it into a hopper. |
||
| + | |||
| + | {{CollapsedVideo|-t_eHjzP0HA|Small, simple, sticky piston free melon/pumpkin farm.}} |
||
| + | |||
| + | === Design 5 === |
||
| + | |||
| + | This design is lag-friendly and uses the [[observer]] block to detect grown pumpkins (or melons) so is only build-able with version 1.11 or above. It is compact and cheap to build and can be easily expanded. |
||
| + | |||
| + | {{CollapsedVideo|0hDOPFUn48Q|Micro Pumpkin & Melon Farm for 1.11+}} |
||
| + | |||
| + | === Design 6 === |
||
| + | This design is similar to design 5. This is how it works: |
||
| + | |||
| + | Place 2 stems on hoed ground like this: |
||
| + | {{BlockGrid |
||
| + | |A=Air|S=Pumpkin-Stem |
||
| + | |SAS |
||
| + | }} |
||
| + | |||
| + | The stems can be melon, pumpkin, or both. |
||
| + | Beneath the empty air block, place any type of block that a melon/pumpkin can grow on, and behind that space place an observer block. Have the observer be wired up to a regular piston pointing towards the air block and on top of it. Finally, have a hopper beneath it that will collect the melons and put it into a chest. |
||
| − | [[Category:Structures]] |
||
| + | {{tutorials}} |
||
| − | [[en: |
+ | [[en:Pumpkin and melon farming]] |
| + | [[de::technik:Kürbis- und Melonenfarm]] |
||
| − | [[pl:Wioski/Struktury]] |
||
| − | [[zh:村庄结构]] |
||
| − | __FORCETOC__ |
||
2018年4月23日 (月) 16:09時点における最新版
ここではカボチャとスイカの栽培について、手動、自動それぞれガイドする。他の作物の栽培についてはFarmingを参照されたし。
成長のしくみ
スイカとカボチャはどちらも成長の仕方は同じで、同じやり方で生産ができる。成熟すれば作物の安定供給が得られるだろう。
種をさがす
栽培を始める前に種が手に入れなければならない。カボチャやスイカの種は廃坑などのチェストから見つかる。あるいは、ワールドに生成されているカボチャやスイカからクラフトしてもいいだろう。
- カボチャはどのバイオームにも草ブロックの上に自然に生成されている。生成確率は1チャンクあたり1/32である。[note 1]
- スイカはジャングルバイオームに自然に生成される。[note 2]
- カボチャの種とスイカの種はどちらも廃坑のチェスト付きトロッコから見つかる。
もし、手元に種がなくてもスイカやカボチャそのものがあったら、そのままクラフトしてみるとよい。すると、4つの種が得られるだろう。また、設置されたスイカを破壊するといくつかのスイカスライスが得られる。これをクラフトすることで種が1つ手に入る。
種を植える
種を無事に入手できたらそれを耕地に植えてみよう。すると、耕地から茎が生え、枯れ木色になるまで成長する。茎の成長は骨粉で促すことも可能だ。ここまで成長すると、茎はもう成長しないが、隣接する空間が、地面が土ブロックや草ブロック、ポドゾルであれば、カボチャやスイカの実がなる。この実は茎を壊さない限り何度でも実る(茎を壊した場合、1~4個の種を落とす)。 ただし、茎とは違い、いくら骨粉を与えても結実を早めることはない。
実が成ったら、いよいよ収穫だ。収穫は素手でもできるが、斧を使うのが一番早い。剣でも早く回収できるが耐久値が2減ってしまう。回収する際、カボチャはブロックのまま穫れるが、スイカは3~7個のスイカスライスとなって回収され、ブロックのまま収穫するにはシルクタッチのエンチャントが必要になる。
また、カボチャとスイカはピストンで動かされるとアイテム化するという性質を持つ(地面を動かしてもアイテム化する)。これを利用することで、自動栽培ができる。
- Thus, hydrated farmland adjacent increases growth rates of stems and production rate of fruit, having the same stem type adjacent to the stem (unless in rows) reduces growth rates and fruit production, light level 9 in the block above the stem is required for any growth, etc.
- The maximum probability of fruit production from a single stem would therefore require a stem in hydrated farmland with hydrated farmland on all eight sides, with four of those farmland blocks remaining unplanted (the corners may be planted with some other crop). Practical farms will often accept reduced per-plant production rates (⅔, ⅓, or even ⅙ of the maximum) for greater space efficiency and ease of harvest.
Manual farms
This section contains suitable layouts for farms that must be manually harvested. The percentages given are space efficiencies. Parenthesized values are theoretical maximums, which assume that there are free blocks surrounding the farm for the border plants to place melons. The maximum possible efficiency for any melon or pumpkin farm is 50% (one fruit per stem). Spaces where a fruit can occupy two or more stems will reduce the efficiency and yield. Question-mark blocks indicate that anything could be put in that spot—perhaps lighting, or other crops such as wheat, carrots, or potatoes. You will probably want to cover the water with a slab, a lily pad, or a carpet.
Simple farms
The following grids will give you different availabilities for designs of pumpkin and melon farms.
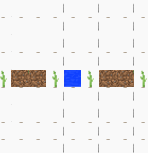
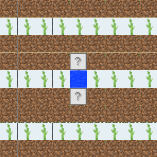
If you just want a quick, compact farm, use design D below. C and D have slightly lower efficiency, but both fit on a "standard farm plot", and are easy to harvest. Of those two, D likely has a faster growth rate due to the separated rows of stalks, but the middle row should not be open dirt/grass or farmland (or more stalks), because any fruit spawned there can tie up two stems. For C, the middle row can be anything except more stalks, for the same reason.
Design A is slightly larger and maximizes space efficiency. It can be tiled for larger farms, but alternate rows should be mirrored top-to-bottom to keep the efficiency. Design B is least efficient, but fits in a slightly smaller plot.
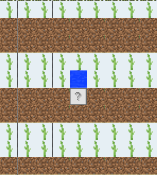 Farm Plan A, 9×10, 48.88% |
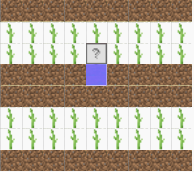 Farm Plan B, 9×8, 43.21% |
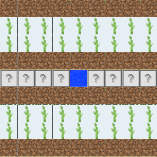 Farm Plan C, 9×9, 44.44% |
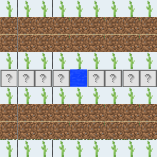 Farm Plan D, 9×9, 44.44% |
Very large farms
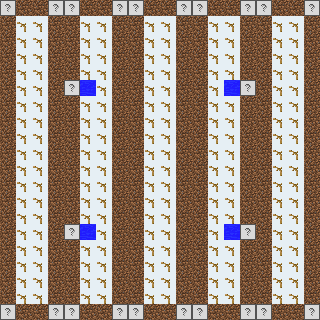
Most of the above farms can be tiled to make larger farms, though in some cases, alternate rows or columns of the plots should be flipped for best results. This farm represents an expansion of design A (turned sideways), with the left column of plots reversed. (It also shows the farmland border for the whole farm.) The basic plots could be repeated further, expanding the farm in units of 9×9. Note that this design aims to make sure that each fruit only occupies one stem - as it increases in size, the efficiency approaches 49%
Multi-level farms
While the above designs all use one layer, the most efficient (49.38%) 9×9 farm can be created by using two layers. Design is based on design D, and cobblestone indicates spaces that will be covered (with dirt) by the layer above.
When replicated over a larger area, design G has spots where you will need to jump. Design H avoids that but keeps the same efficiency. For design H, the water source must be placed with care so that it won't spread into the "corridors". However, if there is the usual pit in the bottom layer (and matching hole above), the source block can be placed against one of the upper blocks, or 2 blocks above that layer. The position of the melon stems and dirt/grass/farmland blocks in the two farming layers can be swapped without losing efficiency.
 Farm Plan G bottom layer, 9×9, 29.62% (44.44%) |
 Farm Plan G upper layer, 9×9 |
 Farm Plan H bottom layer, 9×9, 29.62% (44.44%) |
 Farm Plan H top layer, 9×9 |
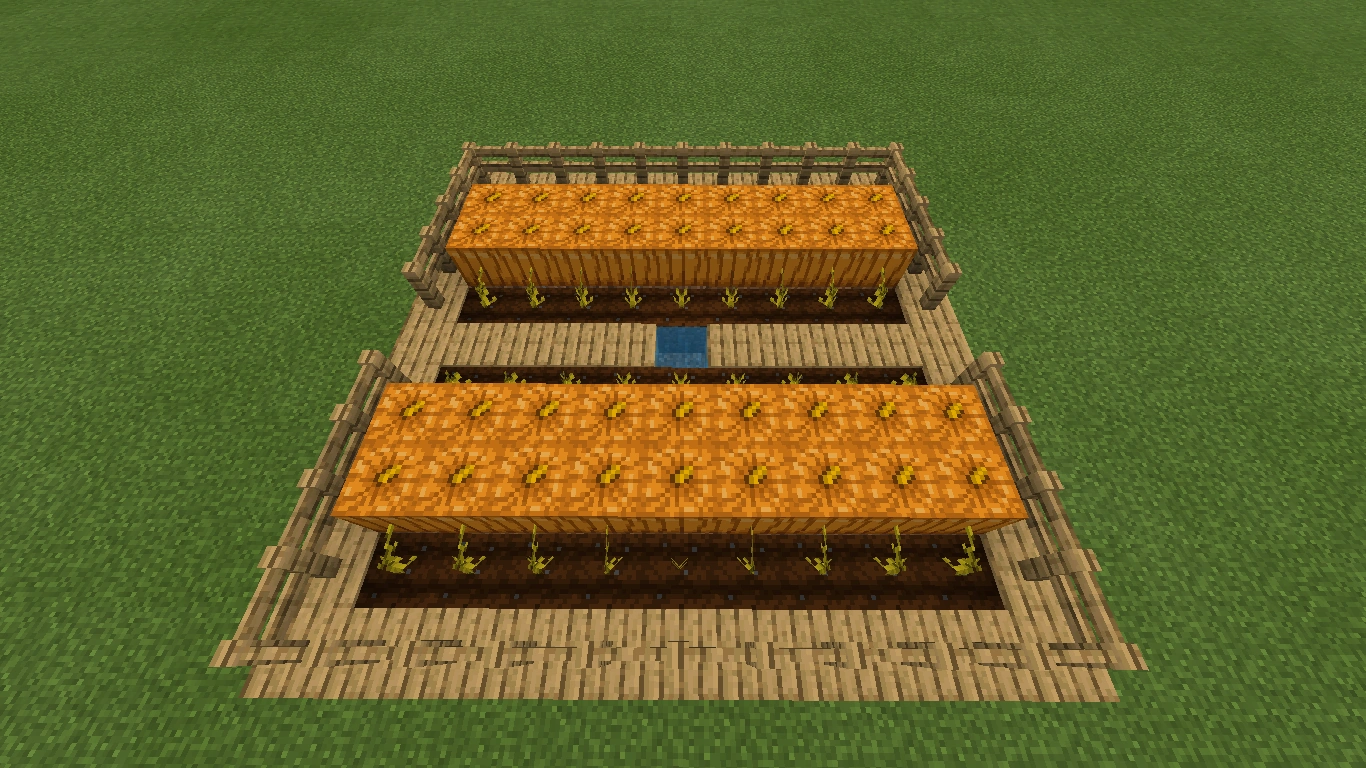
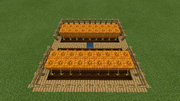
An example of the Plan D simple farm.
Rapid-harvest farms
The above layouts are optimized for high efficiency, at the cost of speed. They work best for infrequent harvests, with plenty of time for the field to regrow in between. For frequent harvests, the first following layout may be better suited; if harvested once per day-and-night cycle, it yields about 17 fruits per harvest (as opposed to about 13 fruits for the above designs). The second layout goes even further in that direction—it does not use space efficiently, but instead gives each stem 2–4 potential places to spawn a pumpkin or melon, encouraging quicker initial growth at the cost of a clumsier design and reduced long-term yield.
 Rapid-harvest Farm 1 |
 Rapid-Harvest Farm 2 |
Semi-automatic farms
Melons and pumpkins are both "dropped" when a piston of any kind pushes them, leading the possibility for auto-harvesting melon farms. A simple Auto-Harvester would be made by placing an upward-facing sticky piston under each farmland block reserved for melons. Alternately, regular pistons can be used (refer to Design 8 to see how). When the pistons are powered, they destroy all of the melons for pickup by the player. Using this technique, one can make a semi automatic farm as shown here, but it will take up extra space for the mechanisms.
The following designs are all possible ways to make a semi-automatic farm:
Design 1
A basic Auto-Harvester Melon farm using Sticky Pistons
Design 2
| A semi-automatic harvesting melon/pumpkin farm.([https://youtube.com/watch?v=chgqDir_990 YouTube) |
|---|
Design 3
| A semi-automatic harvesting pumpkin farm.([https://youtube.com/watch?v=RvrwpUmKi0o YouTube) |
|---|
Design 4
| A semi-automatic harvesting melon farm.([https://youtube.com/watch?v=sYHxxXQZYRk YouTube) |
|---|
Design 5
The following melon/pumpkin farm uses a pressure plate to rapidly pulse a sticky piston.
| Pressure plate activated farm.([https://youtube.com/watch?v=BMni-3p6858 YouTube) |
|---|
Design 6
A compact semi automatic pumpkin and/or melon slice generator, with notification noise:
- Pumpkin generator 1.png
Layer 1
- Pumpkin generator 2.png
Layer 2
- Pumpkin generator 3.png
Layer 3
This design uses 2 stems with 2 spawn places and a notification note block for each. Wooden planks in layer 1 define note block's tone and can be replaced with other blocks according to your preferences. Any opaque block can be used instead of cobblestone. Jack-o-lantern can be replaced with glowstone. Maximum delay is recommended for the redstone repeaters.
Design 7 - Stackable
The following design sacrifices space efficiency in order to fully automate harvesting and allow massive expansion: The tower can be expanded up to the build limit and/or down to bedrock, potentially yielding nearly a thousand growing spaces per tower.
The total area of the farm is 13 blocks by 7 blocks, with alternating piston and farm layers. Its height is 2 blocks, plus 2 more for each "crop layer" of 8 growing spaces. You will need the following materials to make it:
- 16 dirt
- 8 jack-o-lanterns, or glowstone (for lighting)
- 8 iron
- 28 redstone + an extra 10 - 13
- At least 50 generic blocks per crop layer, an extra 43 blocks for the build as a whole.
The farmland is hydrated by water flowing down from above. A pressure plate at the end of the collection area on the bottom activates a redstone torch tower, which in turn activates each piston layer. The harvest falls down the empty middle area into flowing water at the bottom layer, and is channelled to the player standing on the pressure plate.
Starting tips:
- To speed up collection, place ice blocks under the watercourse.
- The farm can be lit from within by glowstone as shown, or much more cheaply by jack-o-lanterns. Unfortunately, you can't place a jack-o-lantern directly onto a piston, so if you will need to put temporary blocks in place of the pistons, put the jack-o-lanterns on top of those, and then replace the temporary blocks with the pistons.
- The pressure plate can be replaced with a hopper or two, leading to a chest or two south of it. Then the redstone can be triggered with a switch anywhere along its length. However, a sufficiently tall farm may produce enough goods to overwhelm the hopper. (750 items—call it a dozen stacks—will take 5 minutes to absorb, so additional stacks may expire. Twenty or so levels of melons could do that, or most of a hundred levels of pumpkins.)
See the following steps to build the farm itself:
- Start with the base layer, which is a modified farm layer. The farmland squares should be planted with your seeds, while the dirt is where pumpkins or melons will grow.
- If you are using jack-o-lanterns for light, remember the temporary blocks as noted above.
- Place a piston layer on top of that. This completes your first crop layer, and for the bare-minimum "tower", you could go on to the cap and water layers from here. More likely, continue to:
- Alternate farm and piston layers, as many as you want. Each pair is a crop layer. This is the expandable section, and you are limited only by resources.
- After the last piston layer, build the cap layer instead of another farm layer. The black wool indicates temporary blocks (any solid, non-falling, block will do) which you will remove after placing the water on the top level.
- Last of all, build the top layer, place the water, and mine out those temporary blocks. For the top-most layer, all the water blocks are sources. (The Art of the Bucket will assist in filling them quickly.)
Schematics:
[図面の使用法]
Base Layer
Piston and Farm Layers
Cap and Water Layers
See the following video for a similar design:
| Design by Panda4994([https://youtube.com/watch?v=kDNr1csDiow YouTube) |
|---|
Design 8 - Using Regular Pistons and A Redstone Timer
| Multi-Crop Farm Design([https://youtube.com/watch?v=wzH_FEvK0tI YouTube) |
|---|
完全自動栽培
全自動栽培とも呼ばれる。これは完成してしまえば収穫と回収の際何もしなくてもよい。動作させるにはピストンとレッドストーンが必要になり、一般的に手動や半自動のものよりもコストが高くなる。
全自動栽培の起動には以下の3通りがある。
- 一定の時間になったら起動するもの。ホッパークロックや日照センサーを使ってできる。
- BUDかオブザーバーを用いたもの。隣接するブロックの更新で起動する。
- カボチャやスイカが生成されて初めて完成するような単純なレッドストーン回路を作成する。
回収は以下の組み合わせで行う。
- 水流
- ホッパー
- ホッパー付きトロッコ
Design 1
このやり方は、カボチャ1つずつにピストンを1つ使い、BUDを利用しない。5×5の面積が必要。
| Jioge's fully automatic farm([https://youtube.com/watch?v=hJf6CragQvA YouTube) |
|---|
Design 2
The following melon/pumpkin farm is completely modular and uses a dropper/hopper combo to detect melon growth. Believed to have the highest efficiency of the fully automatic farms.
| Fully automatic modular melon/pumpkin farm.([https://youtube.com/watch?v=fL7MEDe0XxE YouTube) |
|---|
Design 3
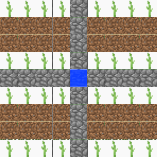
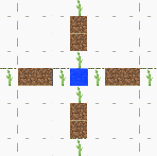
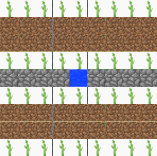
To make this design, you need to first find a small, flat area to build in. Then, start building the farm with the following steps:
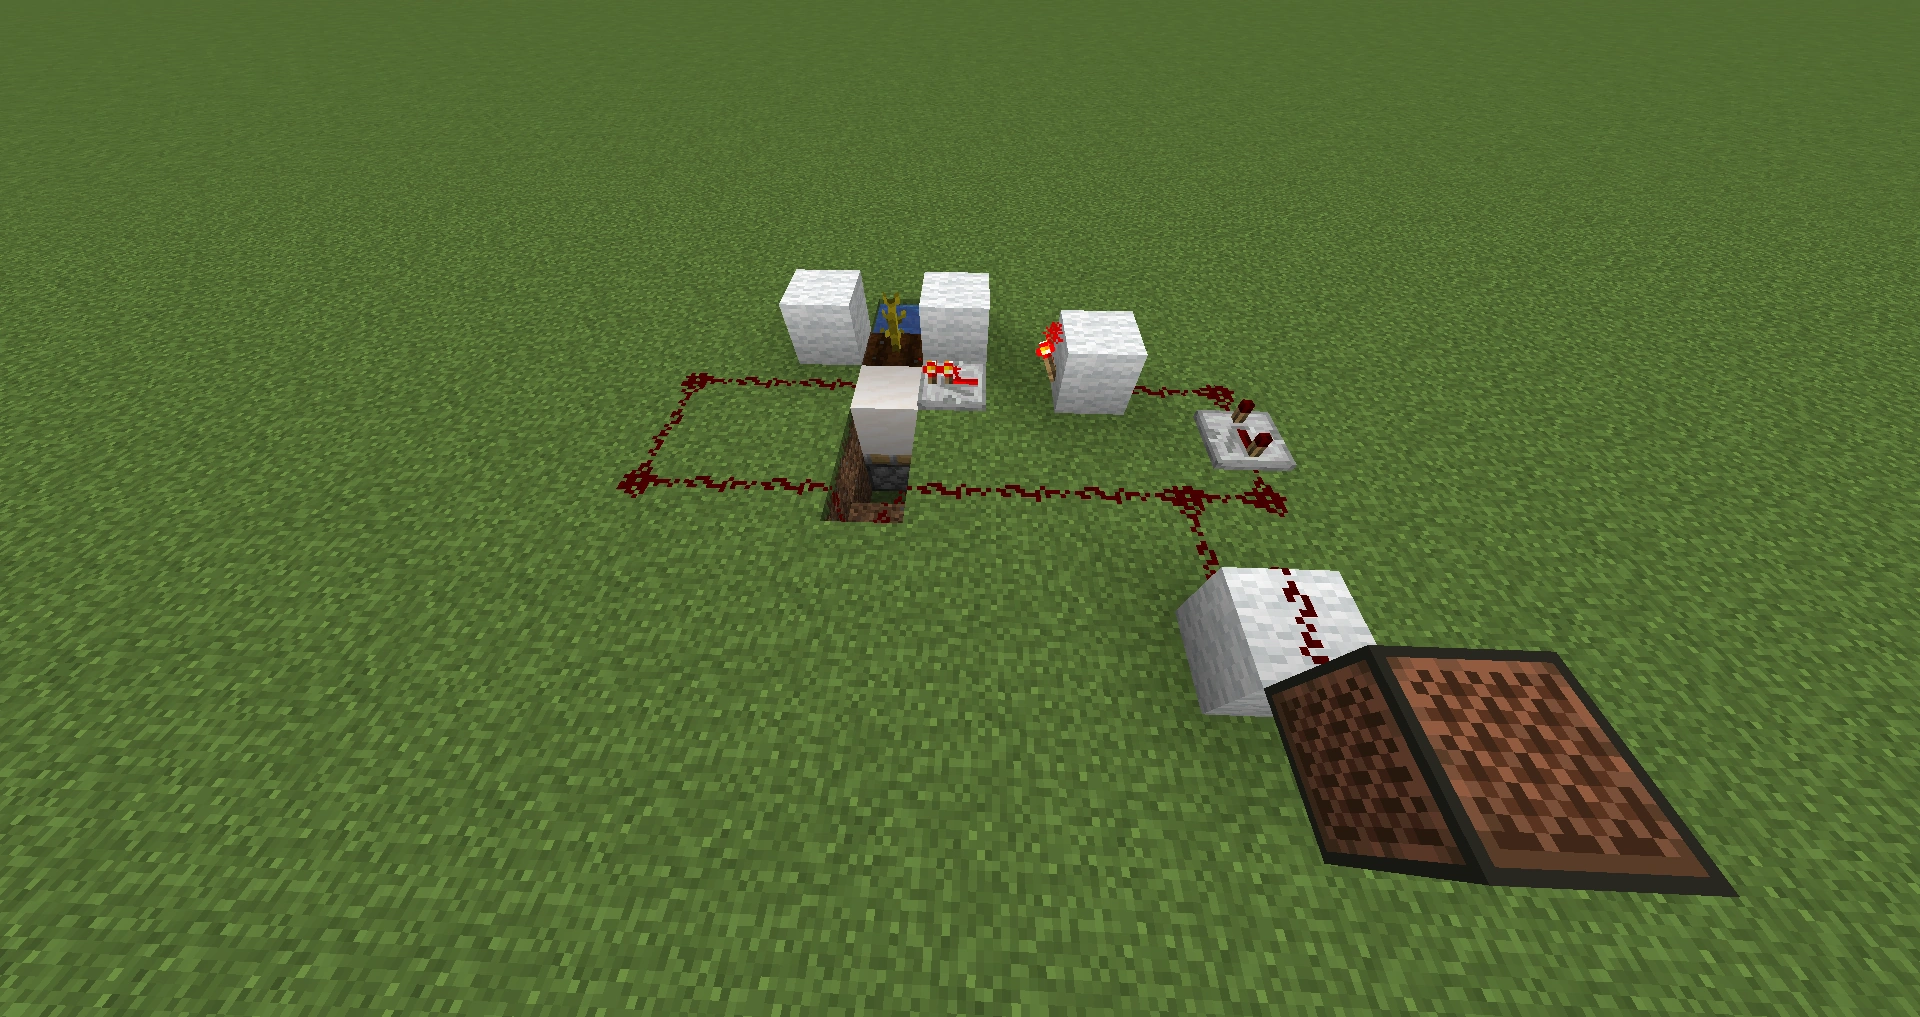
- Start by placing a water source with a bucket, and tilling the grass nearby it.
- Block all but one sides with any block, where the stone bricks are in the image to the right. After that is done, place a sticky piston two blocks below the area you did not cover. Place any solid block where the grass block is shown, and connect it to a redstone torch, make sure it is facing the same direction as the picture is.
- Place a redstone repeater facing away from the redstone torch and pointing towards where your melon/pumpkin will grow. Make a loop around the perimeter with redstone, and the occasional repeater may be necessary, depending how large you are making the structure.
- You can optionally add a note block so that you know when the pumpkin or melon is done (see the picture below)
An additional feature for ease of collecting is to push the pumpkin item or melon slices into a canal. To do this, wire the underground piston's power to power another sticky piston one block above the plant and a block away opposite the water and put a block on its arm (using just the piston arm to push could cause the item(s) to not be pushed). A delay may be necessary for this piston to avoid bugs involving pushed blocks becoming unstuck. Make sure to put a longer delay on the repeater going into the pumpkin or melon. Additionally, several blocks must be placed to ensure each item has nowhere to go but into the water.
After you finish, plant the melon or pumpkin seeds (If you already haven't), and wait for your first harvest.

Design of auto melon and pumpkin farm
Design 4
This farm is very small, has no sticky pistons, and is resource friendly. It uses a BUD switch to determine if a pumpkin/melon has matured and then activates a piston to break it and send it into a hopper.
| Small, simple, sticky piston free melon/pumpkin farm.([https://youtube.com/watch?v=-t_eHjzP0HA YouTube) |
|---|
Design 5
This design is lag-friendly and uses the observer block to detect grown pumpkins (or melons) so is only build-able with version 1.11 or above. It is compact and cheap to build and can be easily expanded.
| Micro Pumpkin & Melon Farm for 1.11+([https://youtube.com/watch?v=0hDOPFUn48Q YouTube) |
|---|
Design 6
This design is similar to design 5. This is how it works:
Place 2 stems on hoed ground like this:
The stems can be melon, pumpkin, or both.
Beneath the empty air block, place any type of block that a melon/pumpkin can grow on, and behind that space place an observer block. Have the observer be wired up to a regular piston pointing towards the air block and on top of it. Finally, have a hopper beneath it that will collect the melons and put it into a chest.
| 新人向け |
| ||||||||||||
|---|---|---|---|---|---|---|---|---|---|---|---|---|---|
| 全般 | |||||||||||||
| チャレンジ |
| ||||||||||||
| 建築 | |||||||||||||
| 生産 |
| ||||||||||||
| エンチャントと製錬 | |||||||||||||
| ブロック破壊 |
| ||||||||||||
| メカニズム |
| ||||||||||||
| サーバー |
| ||||||||||||
| 技術的なチュートリアル |
| ||||||||||||
| 古いチュートリアル |
| ||||||||||||