タグ: ビジュアルエディタ |
タグ: ビジュアルエディタ |
||
| 66行目: | 66行目: | ||
<br /> |
<br /> |
||
| − | [[ファイル:9mapsetx4.png|320px|サムネイル|右| |
+ | [[ファイル:9mapsetx4.png|320px|サムネイル|右|アイテムフレーム内のマップのセット]] |
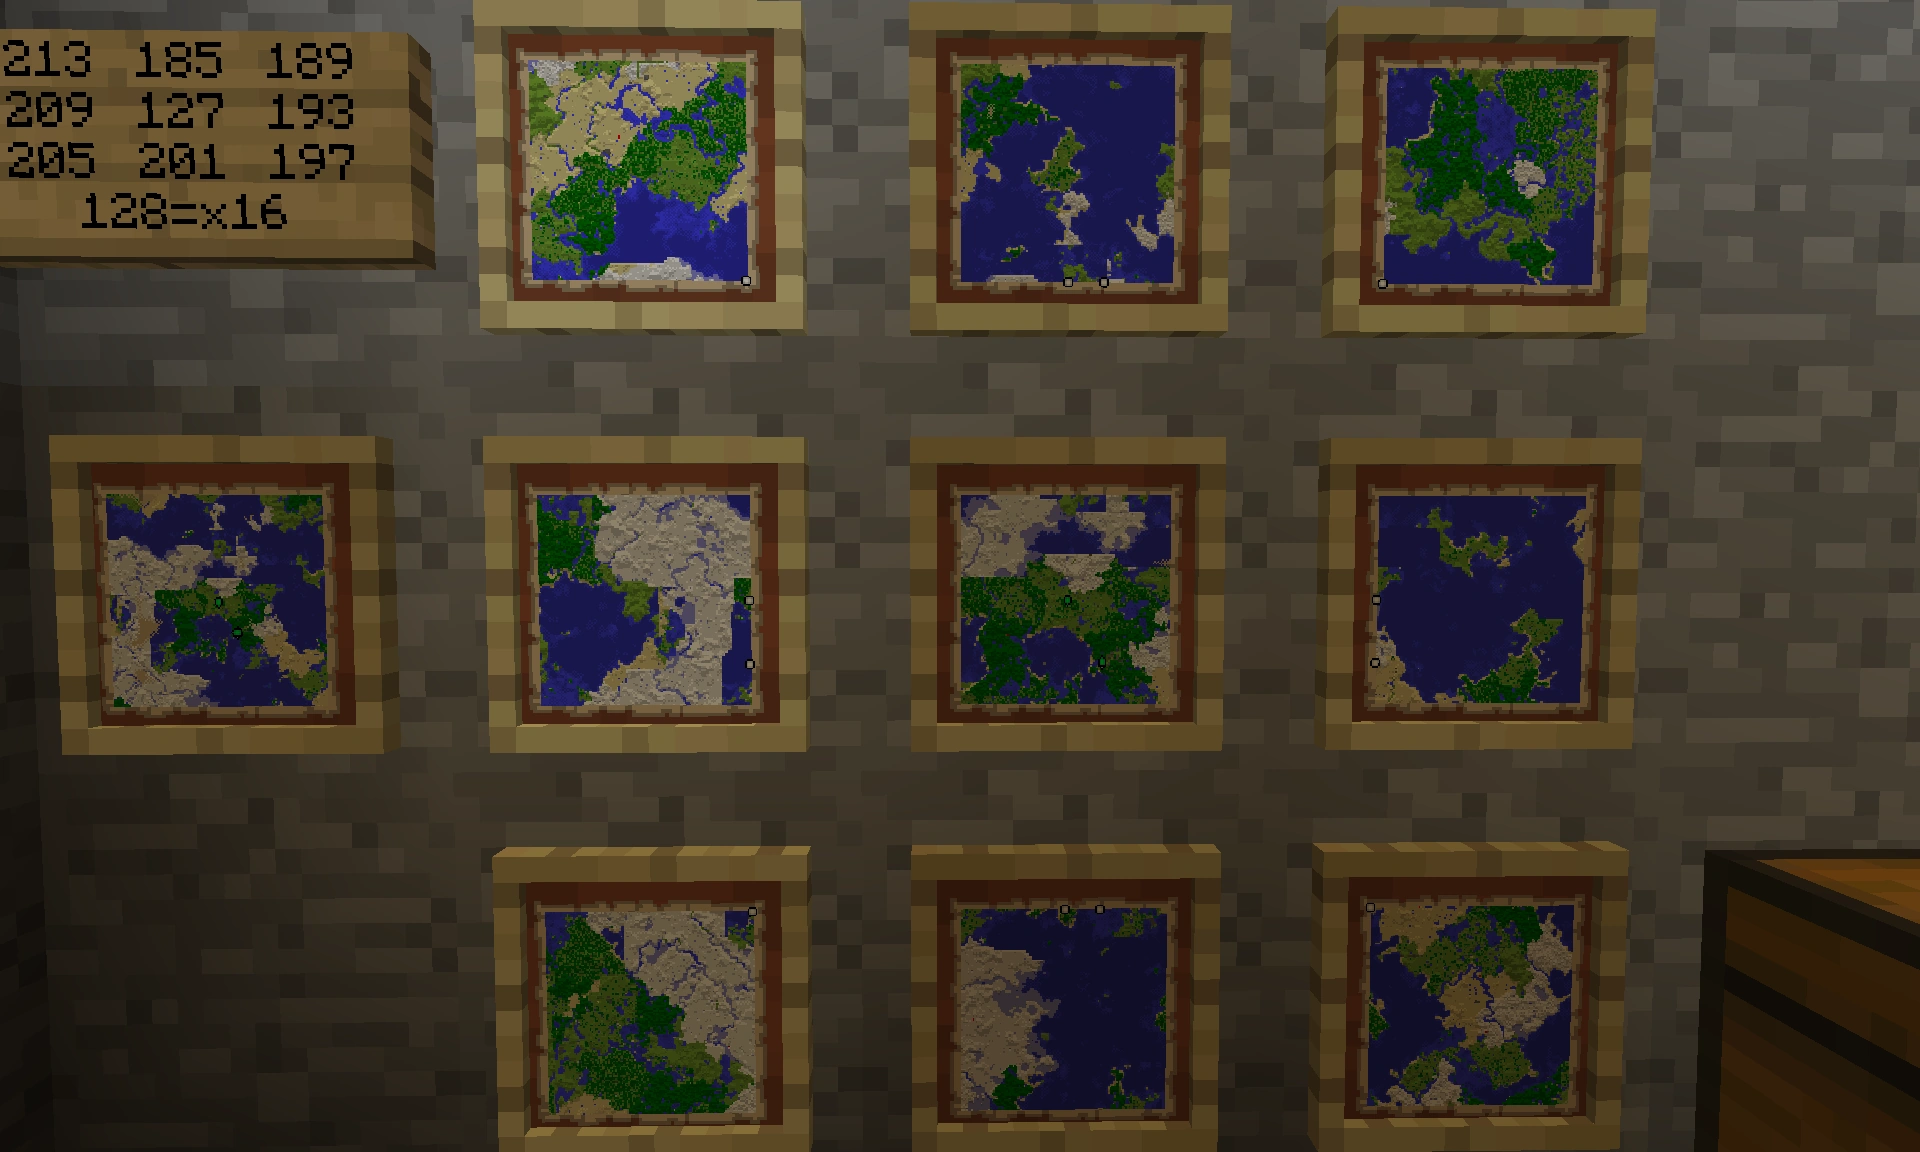
マップの相対的な位置を追跡することは役に立ちます。マップセットを表示する便利な方法は、10個のアイテムフレームを作成し、それらを3行3列の正方形の壁に配置し、10番目が正方形の上または横になるようにします。ズームレベル4の概要を10番目の[[額縁|アイテムフレーム]]に配置します。 9つのマップを3x3の正方形の適切な位置に配置します。原点とおそらくコーナー座標を識別する標識を追加できます。また、地域を探索しながら持ち歩きたいものを複製することもできます。 1つのコピーに追加された情報は、他のすべてのコピーに自動的に更新されます。 (同じエリアの2つ目のマップを作成する-複製ではなく新しく作成することに注意してください-元のバージョンにリンクされていないマップが作成されるため、まったく同じエリアをカバーしていても、マップは更新されません。) |
マップの相対的な位置を追跡することは役に立ちます。マップセットを表示する便利な方法は、10個のアイテムフレームを作成し、それらを3行3列の正方形の壁に配置し、10番目が正方形の上または横になるようにします。ズームレベル4の概要を10番目の[[額縁|アイテムフレーム]]に配置します。 9つのマップを3x3の正方形の適切な位置に配置します。原点とおそらくコーナー座標を識別する標識を追加できます。また、地域を探索しながら持ち歩きたいものを複製することもできます。 1つのコピーに追加された情報は、他のすべてのコピーに自動的に更新されます。 (同じエリアの2つ目のマップを作成する-複製ではなく新しく作成することに注意してください-元のバージョンにリンクされていないマップが作成されるため、まったく同じエリアをカバーしていても、マップは更新されません。) |
||
| + | |||
| + | In the illustration, the sign provides the map # of each of the maps shown. |
||
Map #127 is the center map. Map #185 is the map to the north, #189 to the right of that, and the numbering continues clockwise. |
Map #127 is the center map. Map #185 is the map to the north, #189 to the right of that, and the numbering continues clockwise. |
||
2020年4月18日 (土) 04:14時点における版
このページでは、地図のクラフト方法と、ワールドの中を移動するときどのように自動的に表示されるかを説明する。また、地図の制約と危険性についてもここで説明する。For example, crafting a batch of maps all at once (using shift-click) is generally not helpful because they'll all be duplicates of one another. Mapping was overhauled in update 1.8, and much of the information contained in the following sections is no longer relevant or necessary for game versions 1.8 and beyond.
マップセット
マップのセットを作成する場合、2つのアプローチがあります。 1つ目は、新しいマップを作成する前に、現在のマップの端の外に十分に移動することです。これにより、マップ作成リソースが節約され、混乱を招く冗長なマップ空間が最小限に抑えられます。もう1つの方法は、意図的にオーバーラップを確保して、複数のマップで同じランドマークを見つけやすくすることです。 Pretty Scary Updateで導入されたズームレベルは、次のズームレベルの概観マップがマップを「つなぎ合わせる」ため、ズームレベル0(なし)から3までのどのマップでも「オーバーラップ」技術にはほとんどメリットがありません。
マップの基本
Regardless of which technique is used, it's helpful to be systematic in the order you craft the maps. For example, you might make Map #0 (prior to the Pretty Scary Update this was designated "map_0") at the center of the area you want to cover. When maps are crafted (eight paper surrounding a compass) they are initially "Empty Maps" (data value 395). Holding an empty map and right clicking with it will activate it (data value 358) and draw the current terrain to a radius of 100-120 blocks. The map will be centered on a block that is a multiple of 128 on the x & z axis and will cover an area of 128×128 blocks. Thus, if you are at or near the center block, a zoom-level 0 map is nearly complete when crafted from an empty map.
If you want to keep that map, you should duplicate it at that point by placing it and an "Empty Map" on your crafting area or table. If one of those is then placed in the center of a crafting table and surrounded by eight paper, a zoom-level 1 map is crafted. This map will cover an area 256×256 blocks and would be labeled "Map #1" (assuming no other maps were created in the meantime).
This "zoom-out" step can be repeated three more times with each resultant map, yielding Map #2 (512×512), Map #3 (1024×1024), and Map #4 (2048×2048).
Mapping Step-by-Step
(The numbering below assumes that you create only the maps discussed here and that no one else is creating maps.)
To start, move to a spot within 64 blocks of 0,0 (x and z coordinates should each be between -64 and 64) and activate an Empty Map (Map #0). Duplicate it and use the duplicate to craft a zoom-level 1 (Map #1). Use Map #1 to create a zoom-level 2 map (Map #2), and use that to craft a zoom-level 3 map (Map #3). Duplicate Map #3 and use one to craft a zoom-level 4 map (Map #4) which will provide you with an overview map. This zoom-level 4 map will provide you with a good general orientation—there is a lot of territory to explore within a 2048×2048-block area.
To create a set of zoom-level 3 maps which will better show structures you should then move north to a spot approximately (within 64 blocks) of 0,y,1024. Here, craft a new zoom-level 0 map (Map #5) from an Empty Map. Zoom it out to a zoom-level 3 map (Map #8) which will be retained. Then travel east to a spot within 64 blocks of 1024,y,1024. Craft a zoom-level 0 map (Map #9) and zoom out to a zoom-level 3 map (Map #12) which will be retained. Continuing clockwise, you would proceed south repeat the craft-and-zoom process at:
| map # | x-coord | z-coord | relative position |
|---|---|---|---|
| Map #16 | 1024 | 0 | E, 3:00 |
| Map #20 | 1024 | 1024 | SE, 4:30 |
| Map #24 | 0 | 1024 | S, 6:00 |
| Map #28 | -1024 | 1024 | SW, 7:30 |
| Map #32 | -1024 | 0 | W, 9:00 |
| Map #36 | -1024 | -1024 | NW, 10:30 |
You will now have nine zoom-level 3 maps which cover completely the territory shown by the zoom-level 4 overview map. The set of 9 zoom-level 3 maps actually cover 512 blocks beyond the zoom-level 4 map. Each will be centered on the border of the zoom-level 4 map (and four of which will be centered on the corners of the level-4 map). You can, of course, retain any of the intermediate maps by duplicating them before you zoom them. If you don't duplicate before zooming, you won't be able to obtain them again without using server commands (e.g., "/give <player> 358 1 <map#>", where "358" is the data value for a map and 1 is the number of maps to give) or inventory editors.
マップの相対位置を追跡する
アイテムフレーム内のマップのセット
マップの相対的な位置を追跡することは役に立ちます。マップセットを表示する便利な方法は、10個のアイテムフレームを作成し、それらを3行3列の正方形の壁に配置し、10番目が正方形の上または横になるようにします。ズームレベル4の概要を10番目のアイテムフレームに配置します。 9つのマップを3x3の正方形の適切な位置に配置します。原点とおそらくコーナー座標を識別する標識を追加できます。また、地域を探索しながら持ち歩きたいものを複製することもできます。 1つのコピーに追加された情報は、他のすべてのコピーに自動的に更新されます。 (同じエリアの2つ目のマップを作成する-複製ではなく新しく作成することに注意してください-元のバージョンにリンクされていないマップが作成されるため、まったく同じエリアをカバーしていても、マップは更新されません。)
In the illustration, the sign provides the map # of each of the maps shown.
Map #127 is the center map. Map #185 is the map to the north, #189 to the right of that, and the numbering continues clockwise.
As another option, use a chest, and store the maps in slots in the chest that correspond with their in-world positions. If you use this trick, be careful to put them back in the right place once done with them.
You could also craft a Book & Quill (data value 386) in which you can write descriptions of what the map-set covers. This is a useful place to make notes of interesting spots found on those maps. That Book & Quill can be placed in an item frame next to the map set.
Another trick is to name maps on an anvil. You can name a map for its center or its position relative to other maps, i.e. (0,0) at the origin of your mapping, (0,1) one map east of the origin.
Avoiding Overlaps
This section applies to pre-1.8 games. See the following section on the bountiful update for versions 1.8 and above.
Following the Pretty Scary Update, zoom-level 0 maps will not overlap—they are created with each center 128 blocks from each other center. Since the center-most map has an origin of 0,y,0, each zoom-level 0 map has an x-coordinate and z-coordinate which are each a multiple of 128. All maps created within 64 blocks of a particular pre-defined center will be identical.
Overlapping zoom-level 1 maps
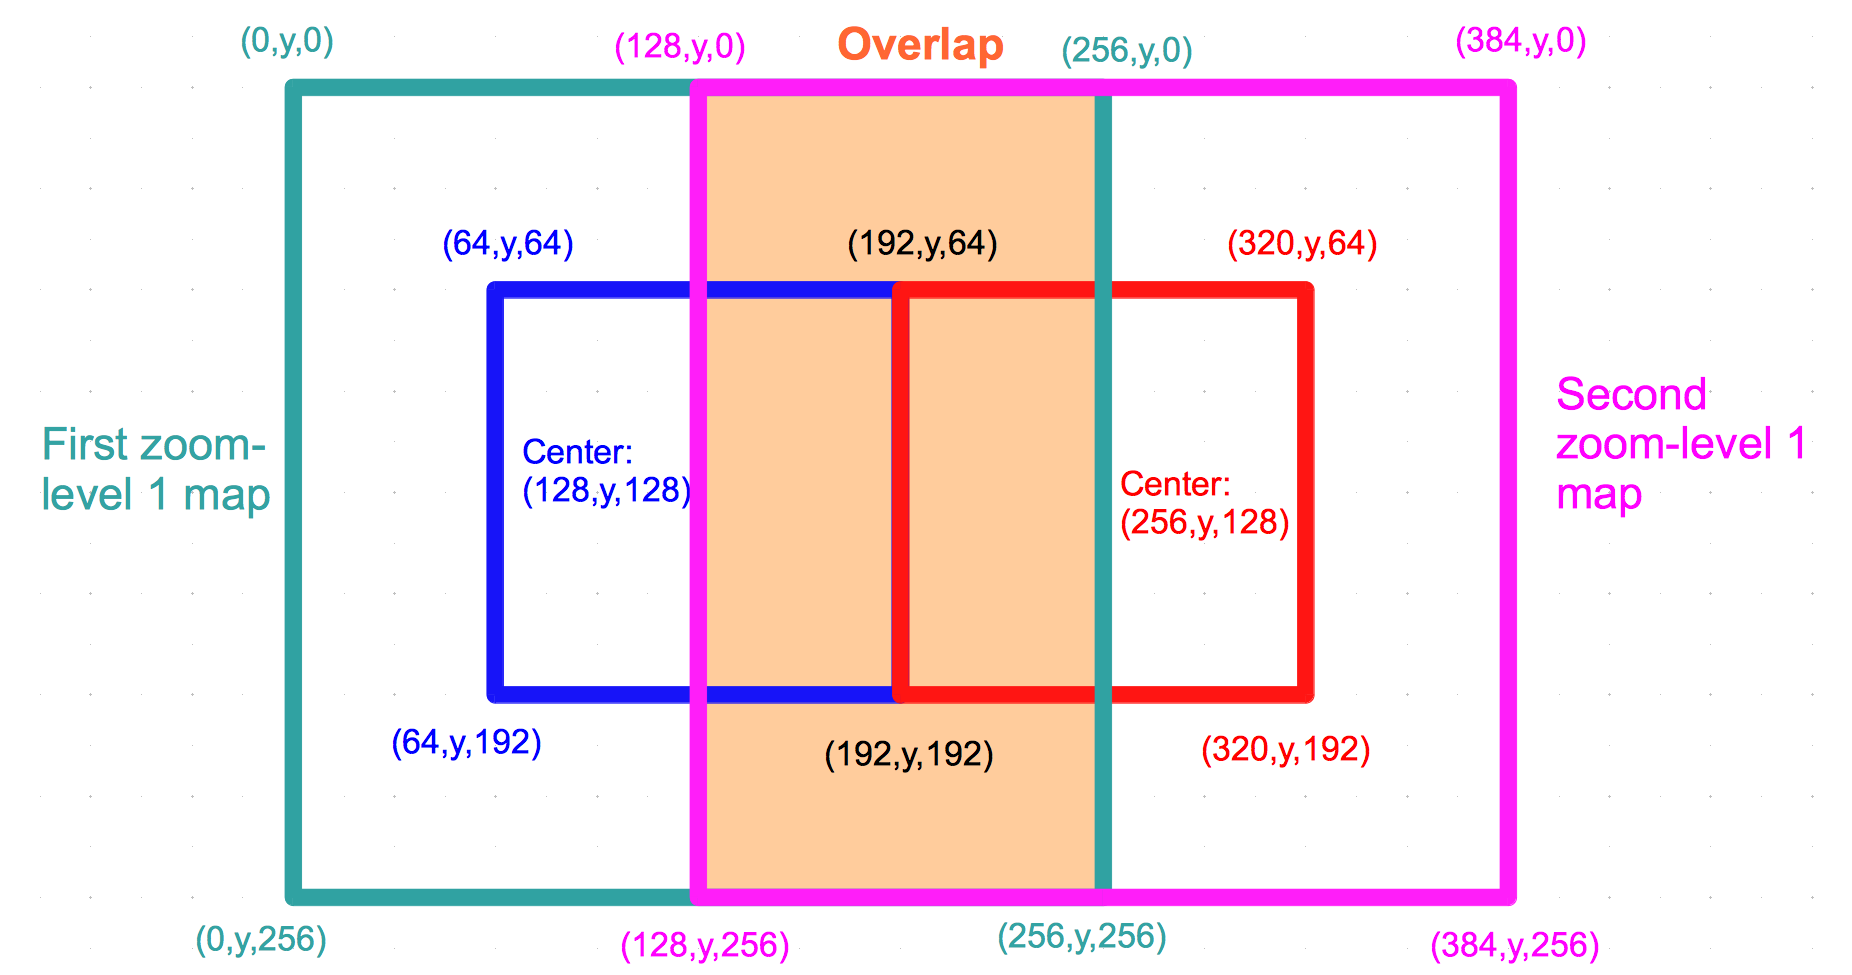
Higher zoom-level maps can overlap one another because they can be crafted from zoom-level 0 maps that are centered only 128 blocks from each other. A zoom-level 1 map, for example, covers 256×256 blocks. So if you create a zoom-level 1 map from a zoom-level 0 map centered on (128,y,128)--which would cover a square bounded by the points (64,y,64)-(192,y,64)-(192,y,192)-(64,y,192)--the zoom-level 1 map will cover a square bounded by the points (0,y,0)-(256,y,0)-(256,y,256)-(0,y,256). The zoom-level 0 map adjacent (to the east) would be centered at (256,y,128) and described by the four points (192,y,64)-(320,y,64)-(320,y,192)-(192,y,192). A zoom-level 1 map crafted from this second zoom-level 0 map would be described by the points (128,y,0)-(384,y,0)-(384,y,256)-(128,y,256). The left half of this second zoom-level 1 map will overlap the right half of the first zoom-level 1 map. The illustration on the right may help.
To keep zoom-level 1 maps from overlapping, ensure that each is built from a zoom-level zero with x- and z-coordinates that are multiples of 256. To keep zoom-level 2 maps from overlapping, build them from zoom-level 0 maps with x/z coordinates that are multiples of 512. Zoom-level 3 maps should only be crafted from zoom-level 0 maps centered on x/z coordinates that are multiples of 1024; and zoom-level 4 maps should be crafted from zoom-level 0 maps with x/z coordinates that are multiples of 2048.
Tip: Mark the center of maps by placing a sign labeled it with the map number, and light it up or mark it in some way so that it's easier to find again. Additionally, craft a duplicate map and place it in a frame at that spot. The map (or its duplicate) will display with a green pointer shown at the location of the item frame.
Tip: Surface lava pools make good landmarks as they show up as red dots on zoomed-out maps. The higher the zoom-level, however, the larger the pool must be before it shows up. You can, of course, make your own lava pool, just be sure it is open to the sky. To be safe, you can cover the lava pools with glass to keep players, mobs, and drops from falling in.
Tip: The Time-Saving Tips page has some extra suggestions for making mapping quicker and safer.
Changes in Bountiful Update
As of Minecraft 1.8 the mapping system changed considerably. Overlapping maps are no longer possible to create at all. Each zoom level of maps has a grid that all maps now align to. The top left corner of each map now aligns to the (x,z) coordinate (-64, -64) +- n*size. Where n is any integer number and size is the map size (128 for zoom level 0, up to 2048 for zoom level 4). The most notable change is that maps no longer zoom out from the center as in version 1.7 but snap to the grid.
Assuming one wants to make maps which cover the origin (0,0) and surrounding area, 4 maps are required. Follow these steps:
- Create 4 blank maps and put them into your inventory
- Travel to coordinates (-80, -80) initialize one map (Map #0)
- Travel to coordinates (-50, -80) initialize one map (Map #1)
- Travel to coordinates (-50, -50) initialize one map (Map #2)
- Travel to coordinates (-80, -50) initialize one map (Map #3)
- Note: -50 and -80 are simply locations on either side of the -64 boundary.
- Zoom these four maps out using the normal process
- Regardless of the zoom level, maps generated from this initial set will always align properly.
This will create 4 perfectly aligned maps covering the origin with the least amount of traveling. The map numbers will cover the area clockwise from "top left" (ie. NW-NE-SE-SW).
| 新人向け |
| ||||||||||||
|---|---|---|---|---|---|---|---|---|---|---|---|---|---|
| 全般 | |||||||||||||
| チャレンジ |
| ||||||||||||
| 建築 | |||||||||||||
| 生産 |
| ||||||||||||
| エンチャントと製錬 | |||||||||||||
| ブロック破壊 |
| ||||||||||||
| メカニズム |
| ||||||||||||
| サーバー |
| ||||||||||||
| 技術的なチュートリアル |
| ||||||||||||
| 古いチュートリアル |
| ||||||||||||