(→全自動農場) |
細 (→種の入手) |
||
| 10行目: | 10行目: | ||
栽培を始めるには、種を入手する必要がある。チェストに入った種をみつけることも可能だし、スイカとスイカの実をみつけてクラフトすることで種を手に入れることもできる。 |
栽培を始めるには、種を入手する必要がある。チェストに入った種をみつけることも可能だし、スイカとスイカの実をみつけてクラフトすることで種を手に入れることもできる。 |
||
* カボチャは、どの[[バイオーム]]でも草の上に自然生成される。<ref group="注釈">すべての[[チャンク]]について32分の1の確率でカボチャが自然生成される。ランダムで座標が選ばれ、その座標を中心とする15×15×7の範囲内で下が草ブロックである空間を探す試行が64回行われる。ランダムで選ばれた座標が上空であったり地下であったりすると、カボチャが生成される確率は著しく減少する。</ref> |
* カボチャは、どの[[バイオーム]]でも草の上に自然生成される。<ref group="注釈">すべての[[チャンク]]について32分の1の確率でカボチャが自然生成される。ランダムで座標が選ばれ、その座標を中心とする15×15×7の範囲内で下が草ブロックである空間を探す試行が64回行われる。ランダムで選ばれた座標が上空であったり地下であったりすると、カボチャが生成される確率は著しく減少する。</ref> |
||
| − | * スイカは、[[ジャングル]]に自然生成される。<ref group="注釈">ジャングルの各チャンクについてランダムで座標が選ばれ、その座標を中心とする15×15×7の範囲内で下が草ブロックでありスイカに置き換えることができるブロック (空気、高い草、ツタなど) を探す試行が64回行われる。ランダムで選ばれた座標が上空で |
+ | * スイカは、[[ジャングル]]に自然生成される。<ref group="注釈">ジャングルの各チャンクについてランダムで座標が選ばれ、その座標を中心とする15×15×7の範囲内で下が草ブロックでありスイカに置き換えることができるブロック (空気、高い草、ツタなど) を探す試行が64回行われる。ランダムで選ばれた座標が上空であったり地下であったりすると、スイカが生成される確率は著しく減少する。</ref> |
* カボチャとスイカの種は、[[廃坑]]の[[チェスト付きトロッコ]]と[[ダンジョン]]のチェストでみつけることができる。 |
* カボチャとスイカの種は、[[廃坑]]の[[チェスト付きトロッコ]]と[[ダンジョン]]のチェストでみつけることができる。 |
||
2019年3月16日 (土) 21:13時点における版
ここでは、カボチャとスイカの栽培について説明する。手動農場と自動農場の両方についての説明がある。他の資源の生産については生産を参照。
成長の仕組み
スイカとカボチャとは、基本的には同じ成長の仕組みを持ち、同じ方法で簡単に栽培することができる。いったん完全に成長させると、安定して収穫することが可能になる。
種の入手
栽培を始めるには、種を入手する必要がある。チェストに入った種をみつけることも可能だし、スイカとスイカの実をみつけてクラフトすることで種を手に入れることもできる。
- カボチャは、どのバイオームでも草の上に自然生成される。[注釈 1]
- スイカは、ジャングルに自然生成される。[注釈 2]
- カボチャとスイカの種は、廃坑のチェスト付きトロッコとダンジョンのチェストでみつけることができる。
もしカボチャをまるごと持っているなら、クラフトすることで4個の種を入手することができる。また、カボチャをどこかに設置してからハサミを使うことで種を入手することもできる。スイカについては、採掘することでスイカの薄切りを入手することができ、スイカの薄切りをクラフトすることで1個の種を入手することができる。
成長の条件
スイカとカボチャの成長率は、小麦、ニンジン、ジャガイモなどの他の作物の成長率と同様である。茎の成長には、完全に成長するまで8段階必要である。骨粉で成長を促すこともできる。
まだ実をつけていない場合、完全に成長した茎がもう1段階成長する (9段階目の成長に達する) ことで実をつけることになる。まず隣接する4ブロックのうちひとつが選ばれ、そのブロックが実をつけることができるブロック (下が土、草、ポドゾル、耕地である空気ブロック) であれば実が生成される。骨粉では実を生成させることができない。
- 隣接するブロックの下のブロックが灌漑された耕地である場合には成長率と実をつける確率が上がる。隣接して同じ種類の茎が植えられている場合、同じ種類が1列に並んでいる場合を除いて成長率と実をつける確率が下がる。成長には、茎の上のブロックについて9レベルの明るさが必要である。
- 1本の茎が実をつける確率を最大にするには、灌漑された耕地に茎を植え、かつ、周囲の8ブロックも灌漑された耕地にする必要がある。実をつけない位置のブロックには他の作物を植えることができるが、実をつける位置のブロックは空けておかなければならない。実際の農場では、土地利用の効率や収穫のしやすさを考慮して、実をつける確率が3分の2、3分の1、6分の1程度に減少することも受け入れなければならない。
どちらの実も耕地を土に変えてしまう。カボチャは斧で収穫するのが最も簡単であり、カボチャをまるごと入手することができる。スイカは斧をつかうことで最も簡単に壊すことができる。スイカは剣でも速く壊すことができるが、剣の耐久の低下が2倍になる。シルクタッチの付いた道具を使った場合を除き、スイカが破壊されることで、3個から7個のスイカの薄切りを入手することになる。カボチャもスイカも、実をクラフトすることで種に変えることができる。成長しきった茎を収穫しても1個から4個の種を入手することができるが、種から茎を育てるより、成長しきった茎から実を収穫した方が種を入手する場合の効率はよい。
- ↑ すべてのチャンクについて32分の1の確率でカボチャが自然生成される。ランダムで座標が選ばれ、その座標を中心とする15×15×7の範囲内で下が草ブロックである空間を探す試行が64回行われる。ランダムで選ばれた座標が上空であったり地下であったりすると、カボチャが生成される確率は著しく減少する。
- ↑ ジャングルの各チャンクについてランダムで座標が選ばれ、その座標を中心とする15×15×7の範囲内で下が草ブロックでありスイカに置き換えることができるブロック (空気、高い草、ツタなど) を探す試行が64回行われる。ランダムで選ばれた座標が上空であったり地下であったりすると、スイカが生成される確率は著しく減少する。
手動農場
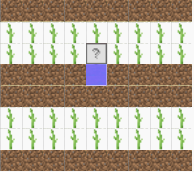
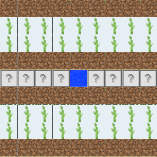
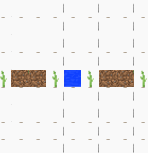
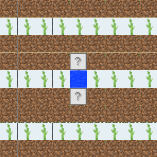
ここでは、手動で収穫する場合の農場のレイアウトについて説明する。表示されている%の数字は、土地の利用効率である。かっこ内の数字は、農場の周囲のブロックが理想的である場合の最大値である。土地の利用効率は、1本の茎が1個の実をつけるとすると、最大でも50%にしかならない。2本以上の茎が1個の実をつけるスペースを共有すると効率が下がることになる。クエスチョンマークで示されたブロックには、光源や小麦, ニンジン、ジャガイモなどの他の作物を配置することができる。水源には、ハーフブロックやスイレンの葉、カーペットなどを設置してもよい。
基本の農場
以下は、カボチャとスイカの農場の利用可能なデザインである。
簡単にコンパクトな農場を作りたいなら、D の案がよい。C と D は、やや土地の利用効率が低いが、どちらも一般的な農場であり、収穫もしやすい。このふたつのうちでは、茎の列が離れているため D の方が成長率が高い。D の中央の列は、土や草、耕地にしてはいけない。この列に実ができると、ふたつの茎がひとつの実を共有することになってしまうからである。C では、中央の列は、同様の理由により茎を植えてはいけない。
A の案は、土地の利用効率が高い。これは、同じものを並べて大きい農場とする場合には、図の上下に並べる場合には、上下を入れ替えたものを交互に並べる必要がある。B は、土地の利用効率が低いが、利用する土地が狭くて済む。
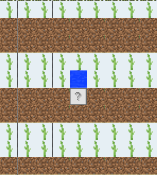 A 案, 9×10, 48.88%. |
 B 案, 9×8, 43.21%. |
 C 案, 9×9, 44.44%. |
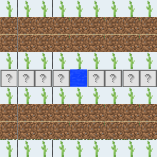 D 案, 9×9, 44.44%. |
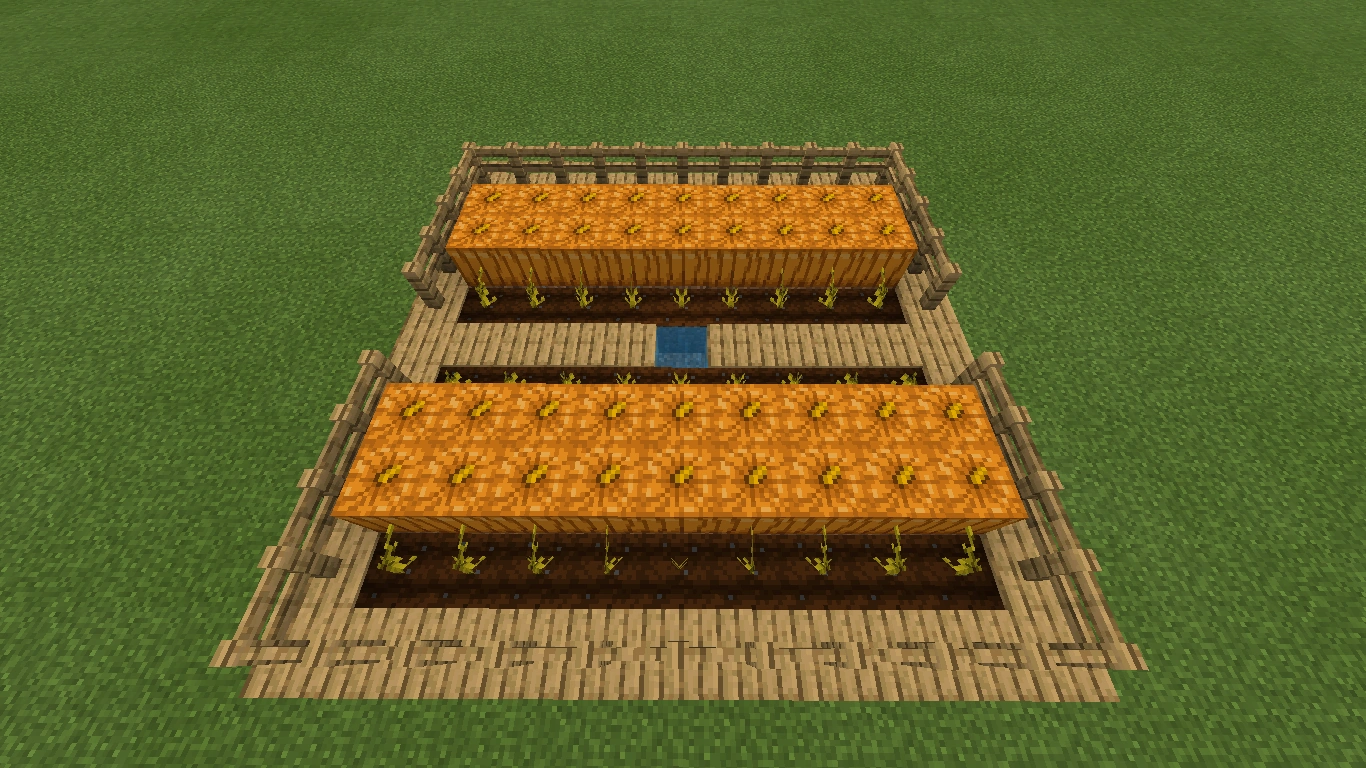
大規模農場
上の農場の案は、並べることで大規模農場とすることができる。ただし、並べる際に向きを反転させる必要があるものもある。ここで示すものは、A 案を向きを変えて並べたものである。一方の列は反転して並べている。また、農場の境界についても表示している。ここで示したものを並べることで、さらに大規模な農場を作ることができる。この農場では、1本の茎に対し1個の実が生成されるようになっている。大規模にすることで、土地の利用効率を49%まで上げることができる。
多層式農場
上のデザインはすべて平面的なものだが、2層式の農場とすることで、9×9のサイズのより効率的な農場を作ることができる。こちらは、D 案を利用するもので、下の層の丸石の上には上の層の土ブロックが設置される。
並べて大規模農場を作る場合、G 案ではジャンプするための場所が必要になる。H 案では、それを避けつつ同じ効率を維持している。H 案では、水源から通路に水が流れ出さないように注意する必要がある。水源を上の層よりも上に設置し、下の層の穴に水が流れ込むようにすることで、水が流れ出ることを防ぐことができる。茎の位置と実をつける位置は、入れ替えることも可能である。
 G 案下層, 9×9, 29.62% (44.44%). |
 G 案上層, 9×9. |
 H 案下層, 9×9, 29.62% (44.44%). |
 H 案上層, 9×9. |

D 案の例
収穫を頻繁に行う場合
上の案は、土地利用の効率を追求したものである。収穫を頻繁に行わない場合でも、高い効率を維持できる。一方、頻繁に収穫するのなら、次の最初の案が優れている。1昼夜の間に1回収穫をするのなら、(上の案では13個だったのに対し)、この案では17個の実を収穫できる。ふたつめの案は、その方向でより発展させたもので、それぞれの茎にとって実をつけることが可能な位置が2から4か所あり、長く育てた場合の効率よりも、最初に実をつけるスピードを重視したものである。
 収穫を頻繁に行う場合 1 |
 収穫を頻繁に行う場合 2 |
半自動農場
スイカもカボチャも、ピストンで押すことでアイテム化できる。この仕組みは、プレイヤーが自分で収穫する農場でも利用できる。単純な方法としては、実をつけるブロックを粘着ピストンで下から押し上げる方法がある。この方法では、アイテムを自動で集めるのが難しいため、半自動農場に適している。
| 英語によるチュートリアル1([https://youtube.com/watch?v=chgqDir_990 YouTube) |
|---|
| 英語によるチュートリアル2([https://youtube.com/watch?v=sYHxxXQZYRk YouTube) |
|---|
| 英語によるチュートリアル3([https://youtube.com/watch?v=BMni-3p6858 YouTube) |
|---|
基本のデザイン
このデザインは粘着ピストンで実の下のブロックを押し上げるものである。水源にハーフブロックを設置し、その下に水流ができないようにすることでレッドストーンを節約することも可能である。
垂直に重ねるデザイン
以下のデザインは、1層では土地利用の効率が劣るが、収穫を自動化し、拡張性を高めるものである。岩盤から建築限界高度まで垂直に重ねることも可能であり、狭いスペースで圧倒的な効率を得ることもできる。
必要なスペースは、水平面で13×7ブロックであり、高さは8か所で収穫するためのピストンと耕地分で2ブロックである。ピストンと耕地を積み上げた上に、さらに追加で2ブロック分の高さが必要になる。必要な材料は、ピストンと耕地の2層について次のとおりである。
- 土ブロック16個
- ジャック・オ・ランタンまたはグロウストーン8個
- 鉄インゴット8個
- レッドストーン28個と追加で10個から13個
- 耕地1層につき通常のブロック50個と全体分の追加で43個
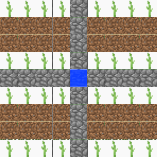
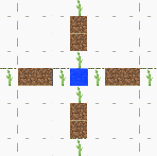
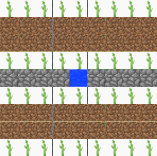
耕地は、いちばん上から流れる水流によって灌漑される。最下層の感圧板からレッドストーンの信号が送られ、各ピストンが動作する。収穫されたアイテムは、中央の空間に落下し、最下層の水流によって感圧板の位置に集められる。
ヒント
- 水流の下に氷ブロックを設置することでアイテムをより速く集めることができる。
- 光源としてはジャック・オ・ランタンの方が入手しやすいが、ジャック・オ・ランタンは仮ブロックを設置してからその上に設置する必要がある。
- 感圧板の位置にホッパーを設置し、チェストにアイテムを集めることもできる。しかし、垂直に高く重ねると、ホッパーで集めきれない数のカボチャやスイカが集まってしまう。
以下の手順で作るとよい。
- 最初にいちばん下の層から作り始める。耕地には種を蒔いておく。
- ジャック・オ・ランタンを使うなら、その下となる位置に仮ブロックを設置する。
- 耕地の上の層にピストンを設置する。この上に蓋となる層と水の層を重ね、最小単位のタワーを作ることもできる。
- 追加の耕地層とピストン層を材料があるだけ積み上げる。
- 最後のピストン層の上には蓋となる層を設置する。黒色の羊毛は仮ブロックであり、落下しないフルブロックなら何でもよく、最後の水の層を設置した後に取り除くことになる。
- いちばん上に水の層を設置する。水はすべて水源とする。水を設置した後、仮ブロックを取り除く。
図面:
[図面の使用法]
最下層
ピストン層と耕地層
蓋となる層と水の層
全自動農場
以下の農場は、いちど作ってしまえばプレイヤーが何もしなくても収穫できるものである。全自動農場では、ピストンとレッドストーンが必要であり、通常、手動や半自動のものに比べて多くの資源が必要になる。
自動で収穫する方法は、次の3とおりである
- 時間の経過で動作させる。ホッパーを利用したクロック回路や日照センサーが利用できる。
- BUD (ブロック更新検出器) やオブザーバーを使う。
- カボチャやスイカが実をつけたときに動作する単純なレッドストーン回路を使う。
カボチャとスイカは、次の方法で集めることができる。
- 水流
- ホッパー
- ホッパー付きトロッコ
カボチャ・スイカによって動作するレッドストーン回路を利用する方式
These farms send redstone power through the space where pumpkin or melon will grow. When the block there is opaque, redstone power can pass to next component which trigger piston to harvest the pumpkin or melon.
第 1 案
This design requires only 1 piston per pumpkin stem, and doesn't require a bud switch. This pumpkin farm fits within a 5x5 area and is simple to build.
第 2 案
This melon/pumpkin farm is completely modular and uses a dropper/hopper combo to detect melon growth.
第 3 案
This farm uses redstone dust to receive power from pumpkin/melon and send power to sticky piston under dirt under growing space.
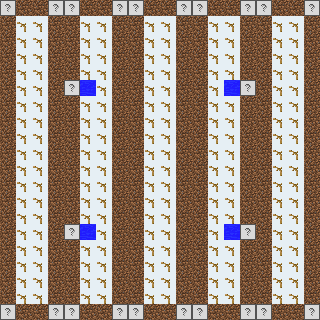
To make this design, you need to first find a small, flat area to build in. Then, start building the farm with the following steps:
- Start by placing a water source with a bucket, and tilling the grass nearby it.
- Block all but one sides with any block, where the stone bricks are in the image to the right. After that is done, place a sticky piston two blocks below the area you did not cover. Place any solid block where the grass block is shown, and connect it to a redstone torch, make sure it is facing the same direction as the picture is.
- Place a redstone repeater facing away from the redstone torch and pointing towards where your melon/pumpkin will grow. Make a loop around the perimeter with redstone, and the occasional repeater may be necessary, depending how large you are making the structure.
- You can optionally add a note block so that you know when the pumpkin or melon is done (see the picture below)
An additional feature for ease of collecting is to push the pumpkin item or melon slices into a canal. To do this, wire the underground piston's power to power another sticky piston one block above the plant and a block away opposite the water and put a block on its arm (using just the piston arm to push could cause the item(s) to not be pushed). A delay may be necessary for this piston to avoid bugs involving pushed blocks becoming unstuck. Make sure to put a longer delay on the repeater going into the pumpkin or melon. Additionally, several blocks must be placed to ensure each item has nowhere to go but into the water.
After you finish, plant the melon or pumpkin seeds (if you already haven't), and wait for your first harvest.
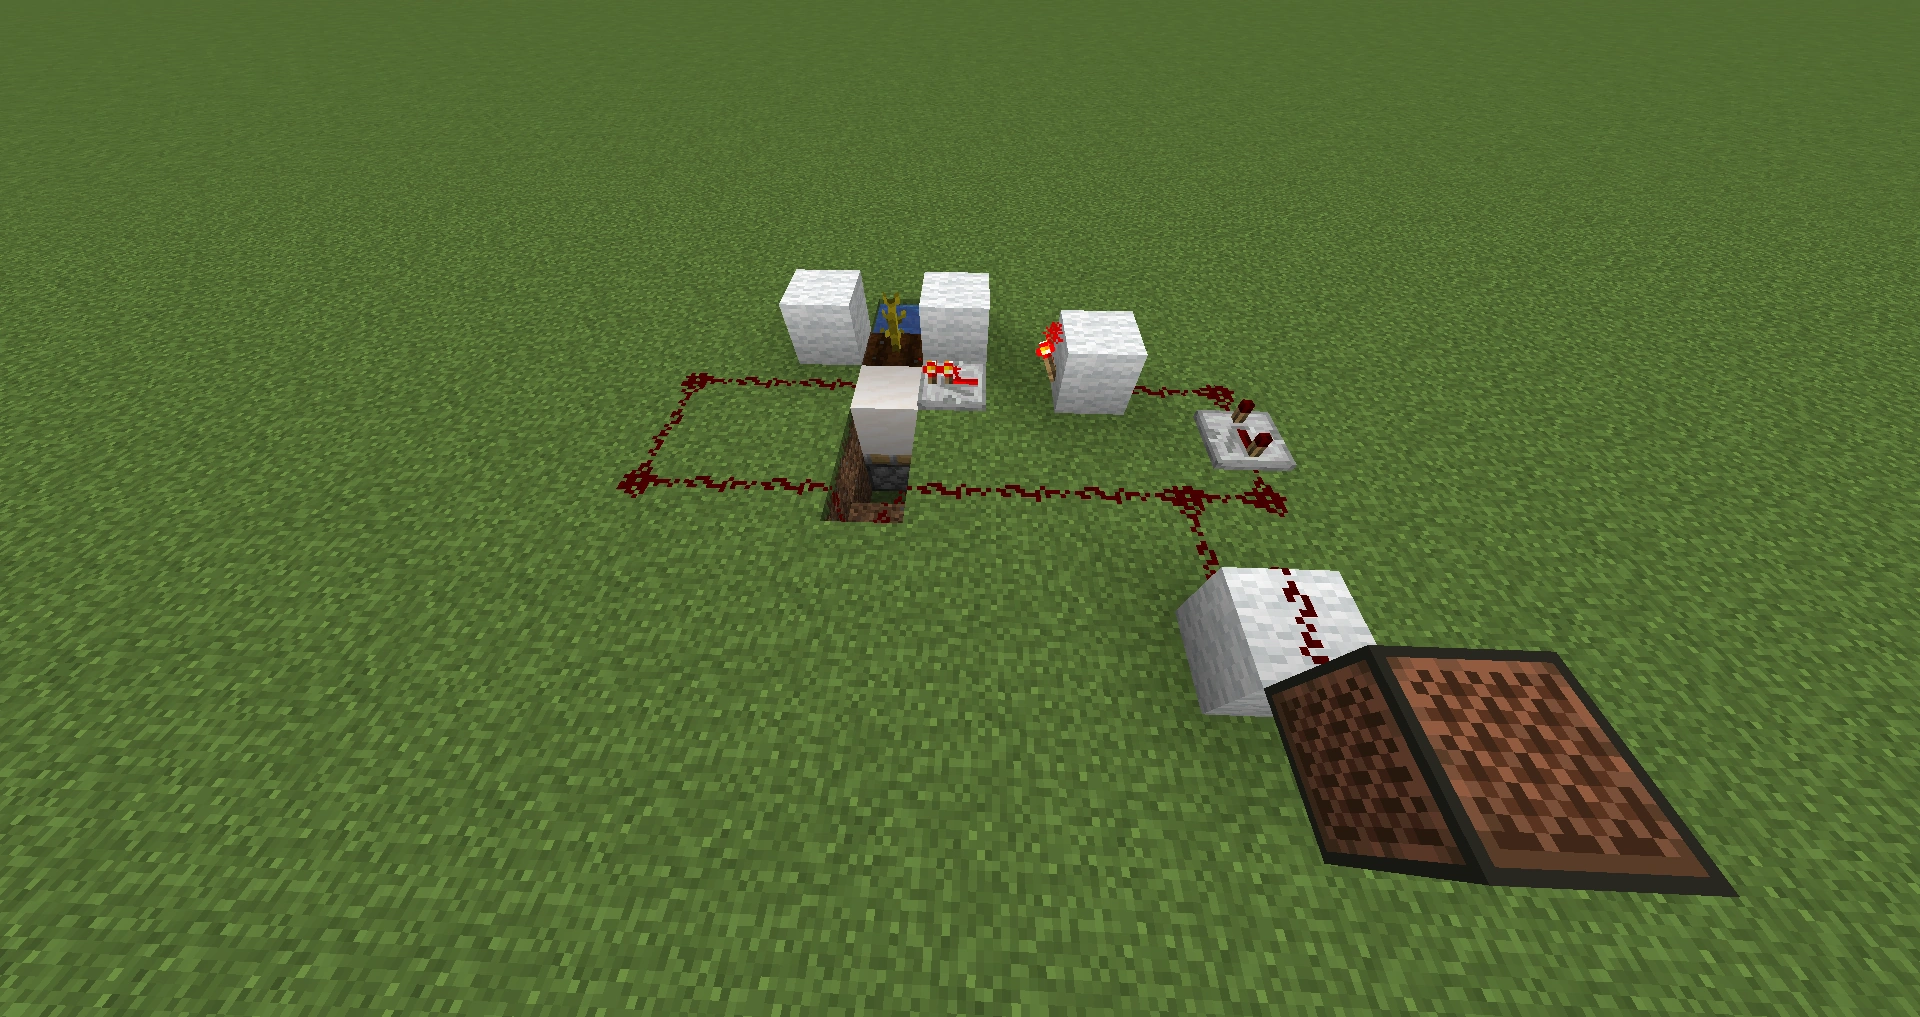

Design of auto melon and pumpkin farm.
第 4 案 - Dual-piston pumpkin detection farm
This farm uses sticky pistons to detect redstone power passed through pumpkin or melon and send signal to regular pistons. The only non-renewable material required is dirt. Everything else can be made of renewable material.
The rightmost column can be rotated around the air column behind the lower piston to save space in tiled farm.
The schematic shows half of tileable part of 4-growing-space floor plan. The other half is north-to-south mirrored copy of the first half, sharing the central slice of hoppers and chests to keep iron cost low (7 hoppers per 4 growing spaces). Each growing space has 2 stems beside it. There are 2 rows of farmland between growing spaces, so each stem in the middle has 5 wet farmlands nearby, resulting in better growth rate than if the stem has less than 4 wet farmlands around. The leftmost and rightmost side of the farm should also have 2 rows of 3 farmlands to have the same stem growth rate. Not all of melon slices are collected by the hoppers, but the amount collected is probably good enough.
The second floor is left-to-right mirror image of first floor, so the upper hopper of the first floor pulls items from the large chest of second floor.
第 5 案 - Dual-piston pumpkin detection farm (non-sticky variant)
This farm design is a variant of design 4 for early game before the player acquires slimeball and sticky piston. It uses 2 regular pistons and 2 sands per growing space. But its height is 6 blocks, 2 times the height of design 4.
BUD 回路を利用する方式
第 6 案
This farm is very small, has no sticky pistons, and is resource friendly. It uses a BUD switch to determine if a pumpkin/melon has matured and then activates a piston to break it and send it into a hopper.
垂直に設置したオブザーバーを利用する方式
Observer on top of melon/pumpkin growing block, looking down, can be used to detect melon/pumpkin growing.
Observer also detects piston arm and other block moved by the piston to harvest pumpkin or melon and may cause the piston to extend and retract in a loop if there is no mechanism to prevent it.
Observer on top of the stem will inhibit growth, so it is cannot be used in this position.
第 7 案
This design is lag-friendly and uses the observer block to detect grown pumpkins (or melons) so is only build-able with version 1.11 or above. It is compact and cheap to build and can be easily expanded.
This design uses sticky piston to push observer down to harvest pumpkin/melon. Piston does not received power from the direction it is facing, so another route is needed to transmit the signal. Slime block is placed between observer and piston to help extracting observer's signal. The signal is passed through 2-tick Redstone Repeater which lengthened it enough for sticky piston to pull blocks back to original position.
第 8 案
This farm packs high yield per growing space in small tile area per growing space (2x2, excluding border and water). All of mechanical and circuitry components are above ground and stem level, so the ground can devote to maximize growing rate. Its stacking height is 6 blocks.
For high output per growing space, plant 4 stems (2 pumpkin stems and 2 melon stems) adjacent to growing space, and surround each stem's root with 6 wet farmlands, so its growth rate is the maximum value (1/3 per random block tick) (1/12 for each available space adjacent to stem). Growing spaces surrounded by 4 such stems have highest possible output rate per growing space. Potatoes are planted to prevent pumpkin or melon growing on farmland where they will not be harvested. The border of farm surrounding the outer stems should have potatoes on wet farmland too if there is available space. Water block is placed every 8x8 area. Stems around water block in the middle of the farm has only 5 wet farmland around them, so their growth rate is slightly reduced to 1/4 per random block tick (1/16 for each available space adjacent to stem). When the farm is extended in schematic east-west direction, sharing the left most and rightmost redstone dust on stationary block, 1 pumpkin or melon fruit growing will trigger 8 pistons at the same time.
水平に設置したオブザーバーを利用する方式
The observer can be used to detect melon/pumpkin growing, or detect the change in the stem when it bears fruit.
第 9 案
This farm uses observer horizontally, it needs a larger area than vertical observer farm. Place 2 stems on farmlands with one air block between the stems. The stems can be melon, pumpkin, or both. Beneath the empty air block, place any type of block that a melon/pumpkin can grow on, and behind that space place an observer block. Have the observer be wired up to a regular piston pointing towards the air block and on top of it. Finally, have a hopper beneath it that will collect the melons and put it into a chest. This method, however, will continuously loop once set off, as the observer sees the piston arm and will trigger over and over again, unless there is a mechanism to stop the signal.
第 10 案 - enhanced observer melon/pumpkin farm
In this case, the observer will measure the stem instead of the fruit. This makes the farm more compact since there is no need for a mechanism that stops the thing from continuously loop once set off as the observer sees the piston arm and will trigger over and over again. The farm produces 12-13 melons per minute.
時間の経過で動作する方式
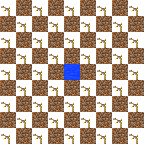
第 11 案 - High-density pumpkin and melon farm
This farm has a high yield per volume. And it takes little resource per growing space when you expand the farm.
The floor consists of farmlands and dirt in the checkerboard pattern. There are hoppers under farmlands and they are connected to a storage container(s). One block of dirt is replaced with water in every 8x8 area. Pumpkin seeds and melon seeds are planted in alternating rows, so their diagonal stem neighbors are of a different kind from themselves. On dirt, blocks are air blocks and on these air blocks are pistons facing down. On the same level as pistons, jack-o'lanterns are placed over stems and farmlands column. The pistons and jack-o'lanterns are in a checkerboard pattern. Redstone pulses from clock are sent to one opaque block on piston, then spread through redstone repeaters and redstone dusts, which are on jack-o'lanterns, and more opaque blocks on pistons. Appropriate clock cycle period may be around 5-6 seconds or longer.
This farm's stacking height is 5 blocks. The second floor does not need another clock. It can take signal from redstone torch column and pass it through pulse limiter in the corner like the first floor. Items from the second floor can be sent down through first floor's water with Minecart with Hopper or chest in the water and Dropper in the Redstone circuit layer with hoppers between them.
| 新人向け |
| ||||||||||||
|---|---|---|---|---|---|---|---|---|---|---|---|---|---|
| 全般 | |||||||||||||
| チャレンジ |
| ||||||||||||
| 建築 | |||||||||||||
| 生産 |
| ||||||||||||
| エンチャントと製錬 | |||||||||||||
| ブロック破壊 |
| ||||||||||||
| メカニズム |
| ||||||||||||
| サーバー |
| ||||||||||||
| 技術的なチュートリアル |
| ||||||||||||
| 古いチュートリアル |
| ||||||||||||